Wednesday, September 4, 2019

Leading a software project from A to Z

Although building a project from ground up is a very challenging task that requires solid nerves, patience, attention to details, good communication skills and mostly motivation, it is also the most interesting work that you will do in your career. You will live the full adventure, not just a part of it where you're usually asked to do something with little to no freedom at all. This time, you are setting up the rules, you are picking the tools and the technologies and you are designing YOUR solution.

Here are some rules that you better follow if you don't want to turn your project into a nightmare.

1. Do a pre-study


The initial requirements are usually very general, giving an overview of what we want but not how to make it. Even if I tell you to develop the exact same watch as the Fitbit Ionic, you can't just rush into the development. You will have to understand the technology, analyze the materials, define how the product shall interact with user, computers, etc...

Build a solid pre-sudy document where every aspect of the product is described, eventually listing different potential solutions with pros and cons. This will naturally lead you to your next step : the product architecture specification.

2. Take all the time you need to write good specifications


Spoiler alert: if you were to develop your product alone, this step is where you would spend one third of your time.

Business managers will always push you to provide the product asap, never caring about QUALITY. To be honest, they do care but differently:

  • For developers, quality is all about architecture, code metrics, tests
  • For business managers, quality is about functional aspects. As long as it works, the quality level is high
  • For QA, quality means following the process. Are all the documents ready and signed ? If yes, quality is alright

What about clients ?

Clients will always want the best product for their money. Their quality perception is based on usability, performances, materials, robustness and ... support services !
If a company cannot sustain its own products, it will dig its own grave because of its high operational cost.

How to prevent this ?

It all starts with specifications. Developers complain about documents that we write but never read and there is a little bit of truth but the exercice worth it because it will highlight many aspects that you'd have ignored in your design (error cases, serviceability, deployability, update startegy, ...).

Where do I start ?

My advice is that you first create diagrams to visualize the features. If your project is not 100% software, then create an SADT diagram with interactions between functions (or go for sysML if you have time). Doing this will help you to distribute the functions between hardware and software.


Now, on software side, think about a design concept and try to put it in a document where you'll elaborate the following points:

* Use case view: Think about how the users will access/use your product and put it in a simple UML Use Case diagram


* Development view: define the modules that will compose your software and use a diagram to show how they'll interact with simple arrows. For instance, this is where I usually put my layered architecture overview


* Logical view: Use this part to define your objects/interfaces. Do not go into details ! At this stage, we just want to understand the intent of each module. I usually insert class diagrams with my interfaces in here.


* Process view: Up to here, the reader only had a static overview of your design. Now you tell him how the modules that you described will behave at runtime (processes, threads, message queues, timers, ...). If the product has performance requirement, explain how they'll be met here.

* Components/package view: A package is a deployable unit. How will you organize your modules/components into these packages ?
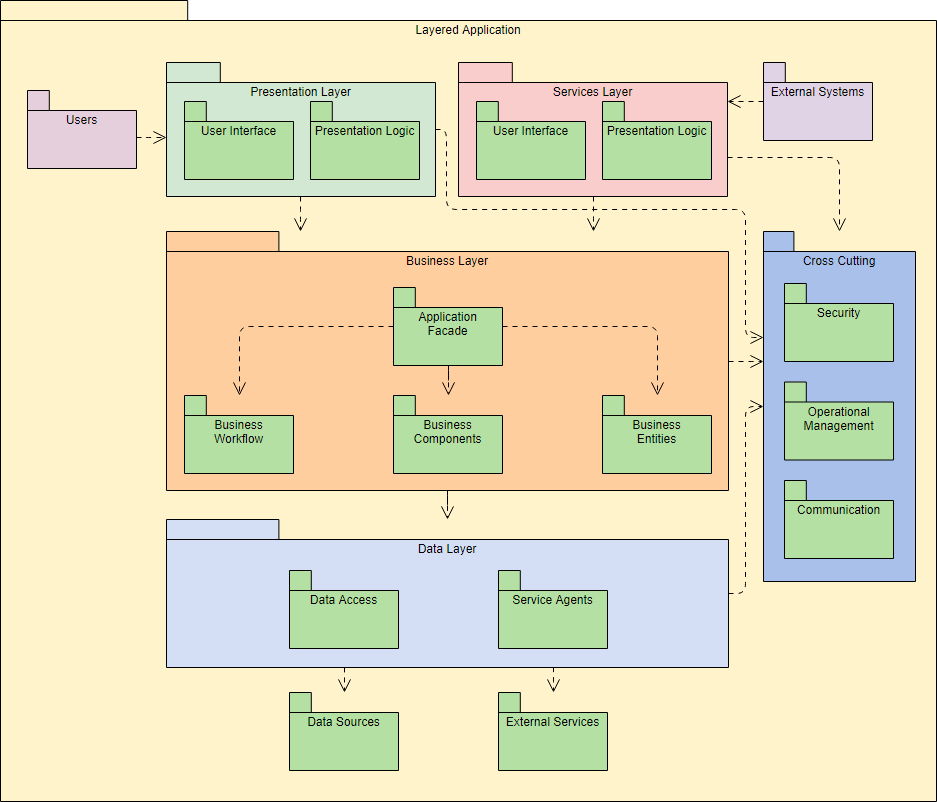
Résultat de recherche d'images pour "package diagram"

Once done, you can move forward with the Software Requirements Specifications (usually called SRS). I strongly recommend you to google 'IEEE SRS' and to get inspired by the IEEE template. It gives very good indications on how your specifications should be written.

In a nutshell:
  • Each requirement shall be testable: do not use vague words like 'hot', 'cold', 'fast enough' ... Give concrete values that a tester can validate.
  • Each requirement shall be uniquely identified: use IDs for all of your requirements. They will be used for traceability in the entire V cycle.
  • Split the specifications following the component structure that you defined in the design concept. For each component, define the inputs, the processing and the outputs
  • For views, insert mockups and specify the actions of each control

3. Pick up your gears


Some technology choices might already be defined at this stage (they influence your design concept). If not, select the frameworks, development environments, source code manager, issue tracker and all other tools that will be necessary to develop/build/deploy your project.
This information usually goes into a 'quality plan' document. This is also where we usually define the branching model, coding rules, planning overview... DO THIS. Especially if you're a team of developers. You'll notice inconsistencies in code, in source code manager and/or in issue tracker if you don't specify the rules somewhere.

4. Organize the work


The components you defined have natural dependencies with each others. Focus on the ones that have less dependencies first.

Tasks
For each components, create a story/task in your issue tracking tool. This task can be broken down into smaller tasks by the developer when taken care of. Evaluate the difficulty of developments for each task and rate them properly either by duration or with story points (recommended).
If you're lucky to work with tools like Jira, create epics for the features that you'd like to implement and organize your tasks. At the very beginning, you can create an epic for the first prototype.

Milestones
Your business manager expects only one delivery but creating intermediate releases along the way is very helpful for demos, regression investigation, test of deployments/updates...
Define the milestones (v1.0.0, v1.1.0, v1.2.0...) and detail what's going to be included in each of them. Be realistic with delivery dates and do not try to anticipate too much. See, when managing a project, people tend to make promises and set unrealistic release dates. In the end, almost all the projects I've seen have been delayed and the funny fact is that it wasn't even due to the development. Clients can make new requests or change existing ones, business can down-prioritize your project, one of the technology used can be not supported anymore, a key developer can resign ... Unexpected things will happen for sure, be prepared.

Ideally, adopt agile methodology and work in sprints.

5. Plan -> Execute -> Check -> Act -> Plan ...


Note: If you're working agile, you're already covering this.

Always re-assess your software requirements depending on business needs. Ideally, bring the client into the loop and ensure that he is aligned with your plan and satisfied with your latest features. If not, plan for the changes and execute.

Also, even if it seems obvious to me, unit tests are not optional. I really encourage you to track your metrics during this phase and to do the efforts to keep them in the green zone.

If you're coordinating other developers, make sure they always understand what they should do. If necessary, take time to explain them your design over and over again. Don't be afraid of repeating things, it can be annoying but you have to be tolerant with your manpower as much as possible.

6. Release often


If your milestone is supposed to end in 3 months, do not wait 3 months to release.
Releasing means bringing all the features together, versioning and deploying. Do it at least at the end of each sprint (if you're not working agile, plan weekly builds). It will reduce the integration penalty and, ideally, will allow you to anticipate on functional/user acceptance tests.

For the versioning, we usually use 3 digits to do this:
  • Major: Only incremented when major changes are made to the code with an impact for the end-user.
  • Minor: Only incremented when minor changes are made to the code without really changing the features but rather extending them slightly. "Look and feel" changes are also usually considered to be minor changes if they do not impact the UX (e.g. usability) heavily.
  • Micro/Build: Incremented for code rework, minor bug fixes, improvement of test coverage, ...

It's not a rule though, you're free to use your own versioning as long as it is consistent over time and that it helps you to identify your software easily.


7. Validation


Most neglected aspect that nevertheless makes a total difference if executed properly, the validation is in my eyes a must-do. Ideally, try to think about validation when writing functional requirements because each of the requirement will need to be testable. If a requirement is too vague to be tested, it can't be implemented, just as simple as that. As a V&V engineer, I should be able to write my test plan based on the functional requirements without any doubt on what needs to be tested.

To illustrate this, here are some examples:

Req 1.1: As a driver, when I press the brakes pedal, my car should stop.

NOT TESTABLE: I see at least 2 reasons :
  • this requirement is not time-bound: if my test proves that the car stops after 30 minutes, the system is valid. 
  • 'should' to be replaced by 'shall'. We want no doubt about what the system shall do.

Req 1.1: As a driver, when I press the brakes pedal, my car shall stop within x seconds with x given with the following relation: x = (speed/10)²

TESTABLE

8. Conclusion


This article gives you an overview of what you'll have to do if you drive a project and lots of other aspects have not been detailed such as reporting, interfacing with other stakeholders, CI/CD ... It can be scary and you'll make mistakes (all of us do) but as long as you try to setup a framework for you and your team and keep executing as defined, you'll be right enough. As a developer, I like to have consistency in my code. Well, as I project leader, I like to have consistency in my project & team.


Thursday, October 4, 2018

Create NuGet packages for Managed and Native libraries

Managed libraries


Nuspec file


Before jumping into nuspec file creation, one should know that nuget can generate a package directly from a visual studio project:

nuget pack MyPackage.csproj

If you're willing to enter advanced mode, then you need a nuspec file.

First of all, instead of recreating the wheel, check the official documentation here : https://docs.microsoft.com/en-us/nuget/create-packages/creating-a-package

Now, here is a shortcut :
    1. Create a .nuspec file and fill it as follows:

    <?xml version="1.0"?>
    <package >
    <metadata>
        <id>Mypackage</id> <!-- Must be unique to avoid confusion during package resolutions -->
        <version>1.0.0</version> <!-- major.minor.micro[.optional] -->
        <title>My first package</title> <!-- Title of the library as it will appear in nuget manager -->
        <authors>Deadpool</authors> <!-- Author of the component -->
        <owners>Marvel</owners> <!-- Legal owner of the component -->
        <description>
        This is a short description of the component and describes what it is intended for.
        </description>
        <releaseNotes>
        [Optional] If this version has any particularity, it should be listed here
        </releaseNotes>
        <summary>
        Same as description but shorter
        </summary>
        <language>en-US</language>
        <projectUrl>http://mygitserver.com/mypackage</projectUrl>
        <requireLicenseAcceptance>false</requireLicenseAcceptance>
        <licenseUrl>http://opensource.org/licenses/Apache-2.0</licenseUrl> <!-- Or any other -->
        <copyright>Copyright if any</copyright>
        <dependencies> <!-- List any dependency that should be checked out with this package -->
            <group targetFramework="net35"> <!-- check all target frameworks here : https://docs.microsoft.com/en-us/nuget/reference/target-frameworks#supported-frameworks -->
                <dependency id="MyDependency" version="2.0.1" /> <!-- Here we specify to use MyDependency v2.0.1 built for .NET3.5 -->
                <!-- Others listed here -->
            </group>
        </dependencies> 
        <references></references> 
        <tags></tags> <!-- [Optional] any tags that would help your team finding your package here -->
    </metadata>
    <files>
        <!-- This will copy all the files from release build output to a lib subfolder in the package -->
        <!-- All references placed under lib will be automatically added to your project -->
        <!-- lib subfolder is mandatory. Create a folder for each supported frameworks -->
        <file src="bin\Release\**" target="lib\net35" exclude="**.pdb" /> 
        <!-- [Optional] Add documentation to the library -->
        <file src="doc\**" target="doc" />
    </files>
    </package>

Once this is done, creating the package is straightforward:

nuget pack Mypackage.nuspec

Notes that might help :

  •  Be careful with dependencies. If your package A depends on a package B 1.0.0.3258 with the latest digit being a build number, ensure that the exact same version of package B is packaged and stored in your nuget server. The build number is re-generated at each build and if it changes, the dependency resolution will fail. Ideally, remove this last digit from version reference.
  •  If your managed library relies on a native dll that is platform sepcific, you'll need to add the dlls to your package as follows:

<?xml version="1.0"?>
<package >
  <metadata>
    <id>Phidgets</id>
    <version>2.1.8</version>
    <title>Phidgets</title>
    <authors>Me</authors>
    <owners>Me</owners>
    <description>
      Phidget interfacing library
    </description>
    <releaseNotes></releaseNotes>
    <summary>
      Phidget interfacing library for .NET
    </summary>
    <language>en-US</language>
    <projectUrl>https://mygitserver.com/Phidgets</projectUrl>
    <requireLicenseAcceptance>false</requireLicenseAcceptance>
    <licenseUrl>http://opensource.org/licenses/Apache-2.0</licenseUrl>
    <copyright></copyright>
    <dependencies>
    </dependencies>
    <references></references>
    <tags></tags>
  </metadata>
  <files>
        <file src="lib\net20\**" target="lib\net20" exclude="**.pdb;" />
        <!-- Platform specific libraries are usually placed under a runtime subfolder in the package. -->
        <!-- The second level specifies the platform with an RID identifier (see here : https://docs.microsoft.com/en-us/dotnet/core/rid-catalog) -->
        <!-- Those libraries won't be copied to your output directory automatically. For that, either use a .targets file (see further in this article) or add a build step in your main project -->
        <file src="native\x86\**" target="runtimes\win-x86\native" />
        <file src="native\x64\**" target="runtimes\win-x64\native" />
  </files>
</package>

Native libraries


Native packages can be generated with a third party app called CoApp if you're not running under Windows 10. Unfortunately, this tool is not maintained anymore, and Win10 users will have to do that manually.

The good news is: it's not that hard.

If you understood the steps for a managed package, you've almost understood how to create a native package as well. Here is an example of nuspec file for a native library:

<?xml version="1.0"?>
<package >
  <metadata>
    <id>stringlib</id>
    <version>4.1.0</version>
    <title>formatlib</title>
    <authors>Me</authors>
    <owners>Me</owners>
    <description>
      Provides string formatting functions for C/C++
    </description>
    <releaseNotes></releaseNotes>
    <summary>
      String formatting library for C/C++
    </summary>
    <language>en-US</language>
    <projectUrl>https://mygitserver.com/stringlib</projectUrl>
    <requireLicenseAcceptance>false</requireLicenseAcceptance>
    <licenseUrl>https://opensource.org/licenses/BSD-3-Clause</licenseUrl>
    <copyright></copyright>
    <dependencies>
    </dependencies>
    <references></references>
    <tags>native</tags> <!-- This is important ! -->
  </metadata>
  <files>
      <!-- Note that now, binaries are placed conventionally under a directory named build -->
      <file src="bin\x86\Release\**" target="build\native\libs" exclude="**.pdb"/>
      <file src="include\**" target="build\native\interface" />
      <file src="doc\**" target="doc" />
  </files>
</package>

AFAIK, there is no clear rule on how one should manage the package structure. The structure I use is:

build
|-native
|-|-libs --> binaries go here
|-|-interface --> public headers go here
doc 

If I want to support several platforms, I can do that:
build
|-native
|-|-libs 
|-|-|-win-x86 --> binaries go here
|-|-|-win-x64 --> binaries go here
|-|-|-linux-x86 --> binaries go here
|-|-interface --> public headers go here
doc 

or

build
|-native
|-|-libs 
|-|-|-v100 --> VS2010 binaries go here
|-|-|-v110 --> VS2012 binaries go here
|-|-interface --> public headers go here
doc 

It is up to you to chose how you'd like them stored. Try to be generic (platform->architecture->toolchain).

Once the nuspec file is done, we have to add build rules that will automatically be merged into our solution. To do that, we can create .props file or .targets file or both !
These files will be imported into our project and Visual Studio will execute them during build.

These files need to be placed under 'build' subfolder in your nuget package and shall be named with your package id:

build
|-native
|-|-libs 
stringbuild.props
stringbuild.targets
|-|-interface --> public headers go here
doc 

Copy and paste the following code into your props file :

<?xml version="1.0" encoding="utf-8"?>
<Project ToolsVersion="4.0" 
    xmlns="http://schemas.microsoft.com/developer/msbuild/2003">
    <ItemDefinitionGroup>
        <ClCompile>
            <AdditionalIncludeDirectories>$(MSBuildThisFileDirectory)native\interface\;%(AdditionalIncludeDirectories)</AdditionalIncludeDirectories>
        </ClCompile>
    </ItemDefinitionGroup>
    <ItemDefinitionGroup Condition="'$(Configuration)|$(Platform)'=='Debug|Win32'">
        <ClCompile>
            <RuntimeLibrary>MultiThreadedDebug</RuntimeLibrary>
        </ClCompile>
        <Link>
            <AdditionalLibraryDirectories>$(MSBuildThisFileDirectory)native\libs\;%(AdditionalLibraryDirectories)</AdditionalLibraryDirectories>
            <!-- Put your lib name here -->
            <AdditionalDependencies>stringlib.lib;%(AdditionalDependencies)</AdditionalDependencies>
        </Link>
    </ItemDefinitionGroup>
    <ItemDefinitionGroup Condition="'$(Configuration)|$(Platform)'=='Release|Win32'">
        <ClCompile>
            <RuntimeLibrary>MultiThreaded</RuntimeLibrary>
        </ClCompile>
        <Link>
            <AdditionalLibraryDirectories>$(MSBuildThisFileDirectory)native\libs\;%(AdditionalLibraryDirectories)</AdditionalLibraryDirectories>
            <!-- Put your lib name here -->
            <AdditionalDependencies>stringlib.lib;%(AdditionalDependencies)</AdditionalDependencies>
        </Link>
    </ItemDefinitionGroup>
</Project>
This file tells Visual studio to add your package directory in include dirs and lib dirs. It also adds a dependency to the project. Say you'd like to automatically copy your dlls to your output directory, in this case, copy and paste the following code into your targets file:
<?xml version="1.0" encoding="utf-8" ?>
<Project xmlns="http://schemas.microsoft.com/developer/msbuild/2003">
    <ItemGroup>
        <StringLibBinaries Include="$(MSBuildThisFileDirectory)native\libs\*.dll" />
    </ItemGroup>
    <Target Name="StringLibCustomTarget" AfterTargets="Build">
        <Copy SourceFiles="@(StringLibBinaries)" DestinationFolder="$(OutDir)" />
    </Target>
</Project>

We're doing this in a targets file because props files can only add a build step that will overwrite any existing build steps in your project.

Alright, now that you're done, just pack your nuget package

nuget pack stringlib.nuspec

Notes that might help :

  •  If you're planning to pack static libraries, you might encounter link issues due to incremental debug level. Unfortunately, the only solution I found here was to pack both Debug and Release libraries and to link the right one against your project depending on your configuration

<AdditionalLibraryDirectories>$(MSBuildThisFileDirectory)native\libs\$(Configuration)\;%(AdditionalLibraryDirectories)</AdditionalLibraryDirectories>

  •  Same trick can be used if you have packed libraries for different visual studio toolchains

<AdditionalLibraryDirectories>$(MSBuildThisFileDirectory)native\libs\$(PlatformToolset)\;%(AdditionalLibraryDirectories)</AdditionalLibraryDirectories>

  •  [Still to be investigated] Some packages are not installing properly from NuGet manager. The installation starts and stops without the green check mark that confirms the installation. I noticed that this was related to the name (e.g. ID) of the package. Suprisingly, adding numbers to the ID (and hence to the names of props and targets files) resolved the issue. This has been seen with VS2012, using Nuget v2.8.

Other things to know about Nuget

Check which version of nuget you need according to the version of visual studio you are using to avoid confusion !

List remote packages

nuget list -Source <url or server name>

Delete package on remote

nuget delete mypackage 1.0.0 -Source <url or server name>

Push a package to remote

nuget push mypackage.1.0.0.nupkg -Source <url>[/subfolder]

with subfolder typically being native or managed.

Force visual studio to install packages in a local directory

Nuget configuration can be overriden by adding a nuget.config file at the root of your solution.
To change the install directory, add this to the file:

<?xml version="1.0" encoding="utf-8"?>
<settings>
  <repositoryPath>..\packages</repositoryPath>
</settings>

In this example, packages will be placed in an upper folder.
Other options can be overriden as listed here : https://docs.microsoft.com/en-us/nuget/reference/nuget-config-file#example-config-file

Monday, August 13, 2018

Migration from SVN to GIT

Step 0 : Define migration strategy


Option 1 [recommended] : If possible, do not bother to migrate the SVN history to git but rather keep the old repositories archived and start over in git from the tip of the trunk.

Option 2 : Migrate trunk and tags only.

Option 3 [can be complex] : Migrate the entire repository.

I picked option 3 because my colleagues wanted to keep all of the history. IMO this is not necessary as long as the old repositories are still accessible. Plus, the migrated history is not perfectly identical to SVN and can be more confusing than helpful.


Step 1 : Create a file with authors


We should convert authors' svn identifiers to git format (Firstname Name <mail>).
To do this, run the following command from your SVN repo

svn log -q | awk -F '|' '/^r/ {sub("^ ", "", $2); sub(" $", "", $2); print $2" = "$2" <"$2">"}' | sort -u > authors.txt


Now edit the file and fill the missing information to finally have something like that:

MMO = Mickey Mouse <mickey.mouse@disney.com>
DDU = Donald Duck <donald.duck@disney.com>

Step 2 : Migrate dependencies first


If your main project is using externals, those will need to be converted to submodules (other options are possible like subtree or third party git externals but in most cases, submodule will do just fine).

To do that, repeat the following commands for each dependency repository:

git svn clone --trunk=<trunk_dir> --branches=<branches_subdir> --tags=<tags_subdir> --no-metadata --authors-file=authors.txt <svn_repo_url> .


Note: if the svn repository follows the standard 'trunk,branches,tags' structure, replace '--trunk=<trunk_dir> --branches=<branches_subdir> --tags=<tags_subdir>' with --stdlayout

Now export the branch list to a file.

git branch -r > branches.txt


Filter the list of branches in branches.txt and keep only those you want to migrate.
Copy tags to a separate file for now (tags.txt).

Now for each entry in branches.txt, do:

git checkout -b <local_branch_name> <remote_branch_name>


Use the branch name in branches.txt for <remote_branch_name>.

For each tag, do the following:

git checkout -b <local_branch_name> <remote_branch_name>
git tag <local_branch_name>
git checkout master
git branch -D <local_branch_name> 

Tags are exported as branches by git-svn so we are forcing a checkout and we manually add the tag in git repository.

Now run the following command to clean history from empty commits (migration side-effect):

git filter-branch --prune-empty -f -- --all


Delete trunk branch

git branch -D trunk


Configure remote git repository

Here I suppose that you already have created a remote git repository to host your code.

git remote add origin <git_remote_repo_url>


Finally push the repo

git push origin --mirror


Step 3 : Migrate the main project repository


Repeat steps from Step 2 until trunk deletion.
From there, we will need to resolve externals.

We will start with master branch, but these steps need to be repeated for each branch.

git checkout master


Run the following command to export the list of externals to a file.

git svn show-externals --id=origin/trunk > externals.txt


Note: In my case, this command wouldn't work for other branches and it is particularily slow. I managed to achieve the same thing from svn command line in the old repository, for each branch.

svn propget svn:externals -R <externals_dir> > externals.txt


Suppose our svn:externals were in a folder named Externals, here is what should be done for each submodule:

git submodule add --force <dependency_git_remote_repo_url> ./Externals/<submodule_dir>


Then we need to fix the submodule to the commit that matches the version used in svn.

cd ./Externals/<submodule_dir>


For tags:
git checkout <commit_id_or_tag_label>


For branches:
git checkout -b <local_name> <remote_git_branch_name>


cd ../..


Repeat these steps for all submodules. Once done, commit:

git commit -m "Migrated svn:externals properties to .gitmodules"


Repeat these steps for all branches. Before starting, for each branch, do cleanup to avoid confusing error messages:

rm -rf ./Externals


Finally, when all branches have been processed, push the repository to remote server:

git remote add origin <git_remote_repo_url>

git push origin --mirror

Tuesday, November 21, 2017

Host a django app in Apache [Windows]

This article explains how to host a django application in Apache server. The following steps are valid for both 32 and 64 bits machine but be sure to install all of the tools for the same architecture.

For the following steps, we imagine that our project is located in C:/tools/SupervisionTool and is structured as shown below:

SupervisionTool/
  Analyzers/
    migrations/
    static/
    templates/
    ...
  SupervisionTool
    settings.py
    urls.py, wsgi.py
  manage.py


Before going further, be sure that you have the Administrator rights on the machine.

1. Install Python 3.6 and ensure that it is added to PATH
2. Install the last version of WAMP
3. Install VC15 redistributable tools
4. Create an environment variable named MOD_WSGI_APACHE_ROOTDIR and set it to apache install directory (c:/<wamp install dir>/bin/apache/apache<version>)
5. If you haven't created a virtual environment for your django application, start with

pip install virtualenvwrapper-win
mkvirtualenv SupervisionTool

<install all the packages necessary for your application (django,pypiwin32,...)>

Then

workon SupervisionTool
pip install mod_wsgi
mod_wsgi-express module-config

The last command will print the lines that will be necessary to configure Apache. You will see something like:


LoadFile "c:/python36/python36.dll"
LoadModule wsgi_module "c:/users/administrateur/envs/supervisiontool/lib/site-packages/mod_wsgi/server/mod_wsgi.cp36-win_amd64.pyd"

Copy these lines and add them to c:/<wamp install dir>/bin/apache/apache<version>/conf/httpd.conf

6. Open c:/<wamp install dir>/bin/apache/apache<version>/conf/extra/httpd-chosts.conf and replace the content with the following lines:

# virtual SupervisionTool
<VirtualHost *:80>
    ServerName localhost
    ServerAlias supervisiontool@lni-swissgas.lni.ads
    ErrorLog "logs/supervisiontool.error.log"
    CustomLog "logs/supervisiontool.access.log" combined
    WSGIScriptAlias /  "C:/tools/SupervisionTool/SupervisionTool/wsgi.py"
    <Directory "C:/tools/SupervisionTool/SupervisionTool">
        <Files wsgi.py>
            Require all granted
        </Files>
    </Directory>

    Alias /Analyzers/static "C:/tools/SupervisionTool/static"
    <Directory "C:/tools/SupervisionTool/static">
        Require all granted
    </Directory>  
</VirtualHost>
# end virtual SupervisionTool


Note: Replace C:/tools/SupervisionTool with your install directory.

7. Run the following command from the project root dir to serve all of the static file (admin included) from a unique directory (defined by STATIC_ROOT):

python manage.py collectstatic

8. Set ALLOWED_HOSTS in SupervisionTool/settings.py to ['*'] (or list the IP adresses or symbols that will give access to the app)
9. Open SupervisionTool/wsgi.py and replace its content with :

activate_this = 'C:/Users/administrateur/Envs/SupervisionTool/Scripts/activate_this.py'
# execfile(activate_this, dict(__file__=activate_this))
exec(open(activate_this).read(),dict(__file__=activate_this))

import os
import sys
import site

# Add the site-packages of the chosen virtualenv to work with
site.addsitedir('C:/Users/administrateur/Envs/SupervisionTool/Lib/site-packages')

# Add the app's directory to the PYTHONPATH
sys.path.append('C:/tools/SupervisionTool')
sys.path.append('C:/tools/SupervisionTool/SupervisionTool')

os.environ['DJANGO_SETTINGS_MODULE'] = 'SupervisionTool.settings'
os.environ.setdefault("DJANGO_SETTINGS_MODULE", "SupervisionTool.settings")

from django.core.wsgi import get_wsgi_application
application = get_wsgi_application()


9. Open Services in Windows and fin Apache (here wampapache) and set the start mode to Automatic. Finally, start apache service.

10. Type localhost in your web browser and verify that your app is accessible.


Troubleshooting


  • Compilation error with mod_wsgi-express module-config : The most probable reason is that you mixed 32/64 bits architectures when installing the tools. Try a cleanup and reinstall.
  • Apache fails to start in Services : Potentially a syntax error in configuration files. To get more information about this, right click on Wamp tools in tray icon menu, select Tools->Show Apache loaded Modules
  • Still not working ? Ensure that you configured PYTHONPATH correctly on host (here, it should be set to C:/tools/SupervisionTool/Analyzers)


Thursday, October 26, 2017

WCE7 : Add chinese characters support

This article explains how chinese characters can be added to WinCE7 OSDesign. Without this feature, the views would display empty square shapes instead of chinese text, meaning that the decoding of input strings failed.

Project properties

Right-click on your OSDesign project and select Locale in the left panel.


On the right side, fill all parameters with languages that you want to include in the image and save.

The NLS Table

The NLS table is a list of locale identifiers that is necessary to .NET Compact framework. The local identifiers of the languages that you want to include in your image must be listed in this table.

To do this, copy the file named nlscfg.inf from %_WINCEROOT%\public\COMMON\oak\files and paste it to %_WINCEROOT%\PLATFORM\<yourBSP>\FILES. Edit this file and overwrite its content with the following:

007f 0403 0406 0407 0807 0c07 1007 1407 0409 0809 0c09 1009 1409 1809 1c09 2009
082C 042C 0423 0402 0845 0445 0405 0465 0408 540A 0425 0429 0464 0447 040D 0439
101A 041A 040E 042B 0411 0437 043F 044B 0412 0457 0440 0427 0426 042F 0450 044E 
0446 0415 0418 0419 044F 041B 0424 041C 1C1A 0C1A 281A 181A 081A 045A 0449 044A 
041E 041F 0444 0422 0420 0843 0443 042A 0804 0C04 1404 1004 0404 2409 2809 2c09 
3009 3409 040a 080a 0c0a 100a 140a 180a 1c0a 200a 240a 280a 2c0a 300a 340a 380a 
3c0a 400a 440a 480a 4c0a 500a 040b 040c 080c 0c0c 100c 140c 180c 040f 0410 0810 
0413 0813 0414 0814 0416 0816 041d 081d 0421 042d 0436 0438 043e 083e 0441 0456
045e 3801 3C01 1401 0C01 0801 2C01 3401 3001 1001 1801 2001 4001 0401 2801 1C01
2401
LOC_INCLUDELOCALES


This table lists all identifiers supported by WCE7. As Erwin pointed out in his blog, some locale identifiers are not supported and will generate exceptions if used in your application.

Pick the right items from Catalog

Look for the following sysgen variables and ensure that they are checked :

SYSGEN_DOTNETV35_SR_CHS
SYSGEN_DOTNETV35_SR_CHT
SYSGEN_UNISCRIBE
SYSGEN_ FONTS_MSYH
SYSGEN_ FONTS_MSYHBD
SYSGEN_ FONTS_MSJH
SYSGEN_ FONTS_MSJHBD
SYSGEN_NLS_ZH
SYSGEN_NLS_ZH_* (all chinese locales)


Now, ensure that the following variables are NOT checked:

SYSGEN_GB18030
SYSGEN_AGFA_FONT

Finally rebuild the entire image. You should see a big difference in the image size (mine went from 37M to 111M).

Thursday, October 5, 2017

Application logs

Logging is a fundamental mechanism for the application. It brings valuable information to support teams when something goes wrong and saves a lot of time in bug investigation. But this utility can easily turn into a "spam engine" if the developers do not carefully select what/when/how much to log.

What do we expect from logs

A support team will look for relevant events or user actions that can explain a troublesome situation. Here is an example:

09:50:05 [INFO] [AppOperation] Mix configured with CMP=Nitrogen, CST=SynthAir, C=245,8 ppm
09:50:05 [INFO] [Solver] Computed flows for (C=2445,8 pp) : MFC1=1200 mlmin, MFC2=2450 mlmin
09:50:06 [INFO] [AppCalibration] Compensation of MFC1=1200 mlmin to MFC1=1202 mlmin
09:50:06 [INFO] [AppCalibration] Compensation of MFC2=2450 mlmin to MFC1=2449 mlmin
09:50:06 [INFO] [Peripherals] Setting MFC1=1200 mlmin
09:50:06 [INFO] [Peripherals] Setting MFC2=2449 mlmin
09:50:06 [INFO] [Peripherals] Setting Hardware state to Mix2Levels
09:50:06 [INFO] [AppOperation] Mix started
09:52:08 [ERROR] [AppAlarm] (Stability Alarm ON) MFC1 flow is not stable (Measured=1015 mlmin)

In this scenario, the user complains about poor results on his device. We suppose that the Alarm was not signaled on a visual indicator to inform the user. With this bunch of logs, developers can immediately:
  • Point the origin of the issue 
  • Get the conditions of the operation that lead to the issue and try to run the same experiment at his office
Obviously, none of these actions will solve the problem but the information that logs gave to the developer will highlight which functional part went wrong, and help him to follow the right track to resolve the client issue.
 It is essential for developers to have the following information in logs:
  • Timestamp 
  • Log level : developers will filter the errors or warnings first to find an obvious reason for the malfunction 
  • Synthetic information : Long phrases are useless: a log must go the point, there is no litterature trophy for well-written logs. Most of the time, use action verbs and parameters. 
  • Workable data : the parameters listed in our logs specify numerical values with a unit. It seems obvious to say that without the unit, the developer cannot investigate. Plus, the location where the error occured is necessary. In our example, the name of classes are displayed. Either do this or use functional area names logged (ex: Config, Security, Alarms, ...). 

Other things to have in mind:
  • Keep files small : do not go over a few MB for text files (I do not include DB here). Opening and parsing a heavy file is long and inefficient. Use several small rolling files instead. 
  • Keep short history : there is no need to keep traces from last week if nothing happened there. This is closely related to file size for text logs.

What to log

  • Application events: notifications, alarms, state changes, ... 
  • Operation-related information : settings update, user actions, ...

What NOT to log

  • Periodic data : if live values need to be logged regularly, put them in a separate log file and preferably go for a DB that can handle large amount of entries better. Developers can then refer to timestamps for investigations. 
  • GUI input errors : if a user enters invalid value, it is not an error for the application, it is an error for the form. As long as the frontend does not interact with the application, whatever happens between the user and the form does not have an impact on the application.

Where to log

A software architecture is built with modules interacting with each others. The business logic of the application is dispatched between these modules. So basically, each functional area of the application shall manage its own logs. To do things neatly, centralize the logging features in a service shared by all components.
Do not repeat information. Take the following example: A calls B, B fails. This is the type of log that we should expect from it:

10:00:01 [INFO] [A] Action A1 started
10:00:01 [INFO] [B] Setting xxx=1234
10:00:01 [ERROR] [A] Action A1 failed (Code=Invalid Setting Error)

and not something like :

10:00:01 [INFO] [A] Action A1 started
10:00:01 [INFO] [B] Setting xxx=1234
10:00:01 [ERROR] [B] Given value is invalid
10:00:01 [ERROR] [A] Action A1 failed (Code=Invalid Setting Error)

The error occured at a known place, so either log it from there or from the client (recommended).

Debugging information

Take the following example of code:

void ExecuteUserRequest()
{
   env = GetEnvironmentValue();
   if(env < THRESHOLD)
   {
      doA();
   }
   else
   {
      doB();
   }
}
Here, myFunc behaves depending on an external factor. Here, we can chose to log the action (doA or doB) with an INFO level and add debugging information to the user to help him understand why this precise action occured :

void ExecuteUserRequest()
{
   env = GetEnvironmentValue();
   LogDebug("env = %d", env);
   if(env < THRESHOLD)
   {
      LogInfo("Executing A");
      doA();
   }
   else if(env >= THRESHOLD)
   {
      LogInfo("Executing B");
      doB();
   }
}
Generally speaking, Debug level gives execution details and exposes implementation data to the developer.

Memo

Here are some basic rules that I use to write my application logs.

Code type Log level
user input error (GUI) No log.
Frequently accessed functions (ex: sensor value read) Debug or no log if we log in a text file. Use a DB if possible.
Implementation detail (subroutines, intermediate values,...) Debug
User action or application event Info
Alarm or abnormal situation that does not result in an error immediately Warn
Operation failure on user action Warn if the error is normal given the context (the product acts as specified). Error otherwise.
Application error (internal non-critical errors or errors managed by the application) Error
Critical non recoverable error (unmanaged exception, errors that lead to a non-functioning application) Fatal

Friday, July 21, 2017

Build U-Boot for BeagleCore

BeagleCore is a variant of the BeagleBone Black. It consists of 2 modules : BCM1 and BCS2:
* BCM1 is the System-On-Module that contains most of the BeagleBone Black design
* BCS2 is a mainboard with the form factor of the original BeagleBone Black. The BCM1 is soldered on BCS2 and the pair is an equivalence of the BBB.

Recently, I needed to run U-Boot on a custom board built with a BCM1. I followed some tutorials on the internet and the result was that U-Boot never started. After some investigations, I found out that the EEPROM that contains BBB identification is not present on BCM1, but is on BCS2 instead. The consequence is that U-Boot cannot identify the board and the initialization procedure fails.
In this post, I will detail every step to make U-Boot run on BCM1.

Note: All of these steps were performed on Windows 10 with bash (ubuntu terminal).

Install tools

sudo apt-get install gcc-arm-linux-gnueab

Create an alias to simply following commands


alias armmake='make -j8 ARCH=arm CROSS_COMPILE=arm-linux-gnueabi- '

Grab U-Boot

git clone
git://git.denx.de/u-boot.git u-boot
cd u-boot

Edit the code


Usually, we do a patch for these type of things. I'll try to post it later.
We will modify some parts of the code to stub the EEPROM so that U-Boot behaves exactly like it was a BBB board.

Open board_detect.c and add the following right after the #include statements:
static struct ti_common_eeprom stub_eeprom = 
{
    TI_EEPROM_HEADER_MAGIC,
    "A335BNLT",
    "00C0",
    "1716BBBK2450",
    "",
    {{0x11,0x22,0x33,0x44,0x55}, // Dummy Mac addresses
     {0x11,0x22,0x33,0x44,0x55},
     {0x11,0x22,0x33,0x44,0x55}},
    11749353662462671858,
    12656917672993063804
};

Replace the content of the function 'eeprom_am_set' with
{
    return 0;
}

Do the same with 'eeprom_am_get'.

Open board_detect.h.

Replace TI_EEPROM_DATA definition with:
 #define TI_EEPROM_DATA ((struct ti_common_eeprom *)\
                &stub_eeprom)

Config & Compile

armmake  distclean
armmake am335x_boneblack_defconfig
armmake

Copy to an SD Card


Format an SD card to FAT32 (boot flag ON).
Go to your U-Boot directory and copy MLO to SD Card first.
Then copy u-boot.img to SD-Card.

And there you go ! U-Boot shall start normally.
Here is an example of my uEnv.txt :
bootpart=0:1
bootdir=
bootfile=uImage
fdtfile=am335x-boneblack.dtb
fdtaddr=0x80F80000
loadaddr=0x80200000
optargs=quiet
mmcdev=0
mmcroot=/dev/mmcblk0p2 ro
mmcrootfstype=ext4 rootwait
loadbootenv=load mmc ${mmcdev} ${loadaddr} ${bootenv}
loadfdt=load mmc ${bootpart} ${fdtaddr} ${bootdir}/${fdtfile}
uenvcmd=load mmc 0 ${loadaddr} ${bootfile};run loadfdt;setenv bootargs console=${console} ${optargs};bootm ${loadaddr} - ${fdtaddr}


biz.