To do this, you will need:
- Visual Studio 2012 or 2013 (2010 would probably work too. However, it won't work with 2015 as Microsoft dropped the support for SQL Server Compact databases)
In Visual Studio:
- Open your project (or create one) with Visual Studio.
- On the left-side panel, open Data Sources and click on Add New Data Source -> DataBase -> DataSet
- If your database is based on SQL Server Compact 3.5 or older:
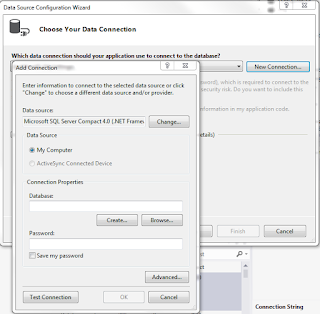
Click on New Connection:
Make sure SQL Server Compact 4.0 is selected.
Click on Create and name a new database. Validate with OK.
Back to the wizard, click now on New Connection and Browse. Pick your database file.
Validate.
- If your database is based on SQL Server Compact 4.0:
Click on New Connection then Browse and pick your database file.
You should now see your database in the Server Explorer (left panel).
- Now open the Extensions Manager with NuGet and install SQL Server Compact & SQlite Toolbox created by ErikEJ.
After rebooting your Visual Studio, you should now see a new icon in the Server Explorer :
- Click on the new blue icon.
Right click on your database (the original) and select the following entry:
Follow the instructions.
The internal scripts will generate a *.sql output with all of the instructions required to create the database back.
With SQLite3 tools:
- Install the sqlite3 tools from here.
- Open a command line (ensure that the location of the sqlite tools is in the path).
- Finally type:
sqlite3.exe DB.db ".read db.sql"
(replace db.sql with the name of your generated sql file)


0 comments:
Post a Comment
Note: Only a member of this blog may post a comment.