In python, like in several other languages, break and continue statements exist to control execution flow. But when it comes to else, it is something new :
for item in itemList:
if item == 'DeveloperLogBook':
print 'Item found'
break
else:
print 'Item not found !'
On the example above, else applies to for loop if it terminates "through exhaustion of the list".
Note: With a while loop, else applies if the condition assertion of while is false.
Showing posts with label python. Show all posts
Showing posts with label python. Show all posts
Wednesday, May 11, 2016
Python : django 1.8 + Restful api + ExtJs 6
This article follows the basic steps to quickly create an application server with django and a PostgreSQL database. It will explain how to integrate ExtJs into a django project and will show some examples of templating.
and add the Rest configuration :
Note 2: Beware of the urlpatterns definition : the function named patterns is now called. Do not forget it or you will have this error : AttributeError: 'str' object has no attribute 'resolve'
Note 3: Do not forget the trailing slash in regex definitions or you will encounter url resolution errors
Finally, migrate your app :
Run the server and go to http://127.0.0.1/api/
Normally, you should see a Django REST framework page. You should be able to log in as well with your predefined admin account.
ExtJS is a standalone MVC framework which means that, event for the creation of views (no model), we will need to create a new django app to host ExtJS stuff.
Open to frontend/views.py and add this content in it
This piece of code is the very basic definition for your index file.
Now open frontend/urls.py and add this piece of code
And uncomment these lines in poc_supervisor/urls.py
https://www.sencha.com/legal/gpl/
static will contain project-wide static files, like CSS, JavaScript.
templates will store project-wide HTML templates. We will use it to store a generic template with a pre-defined header with extjs inclusion.
Unzip extjs archive to static directory
Edit poc_supervisor/settings.py and add the following lines
Add static directory to django project
Add templates directory to django project
Create a base.html file in poc_supervisor/templates and add the following code :
Now let's create an template named index.html in frontend/templates/frontend/ with the following code in it :
As you can see, index.html will inherit base.html and call a javascript file 'app.js' which will handle the form creation for us. We will first create a simple window to make sure everything works as expected.
Create frontend/static/frontend/app.js file with the following code
The next steps are to customize your view with ExtJS !
https://github.com/MaZderMind/django-vs-extjs
Install django dependencies
sudo pip install django-filter djangorestframework django-rest-auth django-registration
Generate views and routes to handle the following HTTP requests :
- GET /api/deviceproxy (get a list of all device proxies)
- POST /api/deviceproxy (add a new device proxy)
- OPTIONS /api/deviceproxy (get meta-information of the DeviceProxy model)
...
'rest_framework',
'rest_framework.authtoken',
'rest_auth',
...
and add the Rest configuration :
REST_FRAMEWORK = {
    # Use hyperlinked styles by default.
    # Only used if the `serializer_class` attribute is not set on a view.
    'DEFAULT_MODEL_SERIALIZER_CLASS':
    'rest_framework.serializers.HyperlinkedModelSerializer',
    'DEFAULT_AUTHENTICATION_CLASSES': (
        'rest_framework.authentication.SessionAuthentication',
    ),

    # Use Django's standard `django.contrib.auth` permissions,
    # or allow read-only access for unauthenticated users.
    'DEFAULT_PERMISSION_CLASSES': [
        'rest_framework.permissions.DjangoModelPermissions',
    ],

    'PAGINATE_BY_PARAM': 'limit',
    'ORDERING_PARAM': 'sort',
    'PAGINATE_BY': 10,
    'MAX_PAGINATE_BY': 100,
    'DEFAULT_FILTER_BACKENDS': [
        'rest_framework.filters.DjangoFilterBackend',
        'rest_framework.filters.OrderingFilter',
    ],
}

LOGIN_REDIRECT_URL = '/api/'
Update your django app
When we followed the django tutorial, we created a basic view in views.py and a url conf in urls.py. Remove both files and add a rest.py file instead with the following code :from rest_framework import viewsets, routers, serializers
from supervisor.models import DeviceProxy, SystemData, SystemDataAcquisition
#
# This file holds the REST related code
#
#################################################################################
#
#
# SERIALIZERS : The serializers specify how the records are serialized in the
# list or detail-views
#
#
#################################################################################
class DeviceProxySerializer(serializers.HyperlinkedModelSerializer):
class Meta:
model = DeviceProxy
fields = ('name', 'description', 'ip_address', 'subnet_mask', 'port',)
class SystemDataSerializer(serializers.HyperlinkedModelSerializer):
class Meta:
model = SystemData
fields = ('identifier', 'description', 'resolution', 'unit',)
class SystemDataAcquisitionSerializer(serializers.HyperlinkedModelSerializer):
class Meta:
model = SystemData
fields = ('device_proxy', 'identifier', 'timestamp', 'status', 'value',)
#################################################################################
#
#
# FILTERS : Use filters to retsrict items returned by querysets (RFU)
#
#
#################################################################################
#################################################################################
#
#
# VIEWSETS : Controllers for incoming requests. They access the model and return
# the proper output
#
#
#################################################################################
class DeviceProxyViewSet(viewsets.ModelViewSet):
queryset = DeviceProxy.objects.all()
serializer_class = DeviceProxySerializer
# filter_class =
class SystemDataViewSet(viewsets.ModelViewSet):
queryset = SystemData.objects.all()
serializer_class = SystemDataSerializer
# filter_class =
class SystemDataAcquisitionViewSet(viewsets.ModelViewSet):
queryset = SystemDataAcquisition.objects.all()
serializer_class = SystemDataAcquisitionSerializer
# filter_class =
#################################################################################
#
# Register viewsets to REST router
#
#################################################################################
def register(restrouter):
restrouter.register(r'deviceproxy', DeviceProxyViewSet)
restrouter.register(r'systemdata', SystemDataViewSet)
restrouter.register(r'SystemDataAcquisition', SystemDataAcquisitionViewSet)
Update your project url settings (urls.py)
Replace the content with the following one :
from django.conf.urls import patterns, include, url
from django.contrib import admin
from rest_framework import viewsets, routers
from supervisor import rest as supervisorAPI

#
# This url pattern definition is the REST-specific one
#
# admin ui
admin.autodiscover()

# routers for the rest-api
restrouter = routers.DefaultRouter()

# add api-router for the supervisor application
supervisorAPI.register(restrouter)

# root-level url patterns
urlpatterns = patterns('',
    # frontpage
    #url(r'^', include('frontend.urls')),
    # admin-ui
    url(r'^admin/', include(admin.site.urls)),
    # provide a login-link in the browsable api
    url(r'^api/ui-auth/', include('rest_framework.urls', namespace='rest_framework')),
    # login for rest-api
    #url(r'^api/auth/', include('rest_auth.urls')),
    # login for rest-api
    #url(r'^api/', include('frontend.apiurls')),
    # base for the browsable rest-api
    url(r'^api/', include(restrouter.urls)),
)
Note 1: Do not mind the commented code for the moment, we will see that laterNote 2: Beware of the urlpatterns definition : the function named patterns is now called. Do not forget it or you will have this error : AttributeError: 'str' object has no attribute 'resolve'
Note 3: Do not forget the trailing slash in regex definitions or you will encounter url resolution errors
Finally, migrate your app :
python manage.py migrate
Verify that REST operation are activated
Run the server and go to http://127.0.0.1/api/
Normally, you should see a Django REST framework page. You should be able to log in as well with your predefined admin account.
Add an ExtJS frontend
ExtJS is a standalone MVC framework which means that, event for the creation of views (no model), we will need to create a new django app to host ExtJS stuff.
python manage.py startapp frontend
Open to frontend/views.py and add this content in it
from django.http import HttpResponse
from django.shortcuts import render
from django.views.decorators.csrf import ensure_csrf_cookie
import json

# Create your views here.

@ensure_csrf_cookie
def index(request):
    return render(request, 'frontend/index.html')

def permissions(request):
    print request.user.user_permissions.all()
    return HttpResponse(json.dumps(
        {
            'is_superuser': request.user.is_superuser,
            'user_permissions': list(map(lambda x:str(x.codename), request.user.user_permissions.all()))
        }

    ), 'applicative/json')
This piece of code is the very basic definition for your index file.
Now open frontend/urls.py and add this piece of code
from django.conf.urls import patterns, url

from frontend import views

urlpatterns = patterns('',
    url(r'^$', views.index, name='index'),
)

Create frontend/apiurls.py file and add the following code in it

from django.conf.urls import patterns, url
from frontend import views

urlpatterns = patterns('',
    url(r'^auth/permissions/$', views.permissions, name='permissions'),
)
Ok, we need now to define this app in the projects. Add the name of the app in INSTALLED_APPS in poc_supervisor/settings.py :... 'supervisor', 'frontend', ...
And uncomment these lines in poc_supervisor/urls.py
...
url(r'^', include('frontend.urls')),
url(r'^api/auth/', include('rest_auth.urls')),
url(r'^api/', include('frontend.apiurls')),
...
At this moment, you can run your server and try to open http://127.0.0.1/ which will end with a 404 error. Why ? Because the index.html file has not been defined ! This time, instead of creating a basic 'Hello World' html page, we will use django templates to create a default ExtJS model (v6.0.0) that we will inherit in our frontend index page. Huh ?! Yeah yeah, let's go through the following steps :ExtJs setup
Download ExtJs
https://www.sencha.com/legal/gpl/
Create ExtJs directories
At the root of your project (where manage.py is located) :mkdir static mkdir templates
static will contain project-wide static files, like CSS, JavaScript.
templates will store project-wide HTML templates. We will use it to store a generic template with a pre-defined header with extjs inclusion.
Unzip extjs archive to static directory
unzip ext-6.0.0-gpl.zip -d static/
Configure Django
Edit poc_supervisor/settings.py and add the following lines
Add static directory to django project
STATICFILES_DIRS = [
    os.path.join(BASE_DIR, 'static')
    ]
Add templates directory to django project
TEMPLATES = [
    {
        'BACKEND': 'django.template.backends.django.DjangoTemplates',
        'DIRS': [
                os.path.join(BASE_DIR, 'templates')
        ],
    ....
Create a base.html file in poc_supervisor/templates and add the following code :
 <!-- Do NOT put any DOCTYPE here unless you want problems in IEs. -->
<html>
    <head>
        <meta http-equiv="X-UA-Compatible" content="IE=edge">
        <meta http-equiv="Content-Type" content="text/html; charset=utf-8">
        <!-- Importing Extjs library -->
        <script type="text/javascript" src="/static/ext-6.0.0/build/ext-all-debug.js"></script>
        <script type="text/javascript" src="/static/ext-6.0.0/build/classic/theme-triton/theme-triton-debug.js"></script>

        <!-- Importing the stylesheet triton -->
        <link rel="stylesheet" type="text/css" href="/static/ext-6.0.0/build/classic/theme-triton/resources/theme-triton-all-debug.css">

        {% block head %}{% endblock %}
    </head>

    <body>
        {% block content %}{% endblock %}
    </body>
</html>
Now let's create an template named index.html in frontend/templates/frontend/ with the following code in it :
{% extends "base.html" %}

{% block title %}Hello ExtJS Supervisor{% endblock %}

{% block head %}

    <script type='text/javascript' src='/static/frontend/app.js'></script>

{% endblock %}

{% block content %}

{% endblock %}
As you can see, index.html will inherit base.html and call a javascript file 'app.js' which will handle the form creation for us. We will first create a simple window to make sure everything works as expected.
Create frontend/static/frontend/app.js file with the following code
Ext.application({
    name: 'Supervisor',
    launch : function() {
        var win = Ext.create("Ext.window.Window", {
        title: 'My first window',
        width: 300,
        height: 200,
        maximizable: true,
        html: 'this is my first window'
        });
    win.show();
    }
});
Finally, edit the index function that we've created before in supervisor/views.py : from django.shortcuts import render_to_response
def index(request):
return render_to_response('supervisor/index.html')
Ok, now run your server and you should see a nice looking window displayed ! Otherwise, double check your ext-js includes.The next steps are to customize your view with ExtJS !
Credits
https://github.com/MaZderMind/django-vs-extjs

Python : django 1.8 + PostgreSQL shortened tutorial
This article is a compressed version of the first 2 chapters of django official tutorial. It does not explain anything but simply goes through the basic procedures to create a application server in a short time.
Log into postgres and create a database for that user
Finally, edit postgres configuration file
Replace ident or peer with trust
Run server (default: 127.0.0.1:8000) :
Ctrl+C to quit
Create an app (let's call it supervisor):
Edit supervisor/apps.py (app generic configuration information):
- create a file named urls.py with the following code to map view to URL
- edit poc_supervisor/urls.py to point new view to root
and open 127.0.0.1:8000/supervisor
Generate database tables for all INSTALLED_APPS
Verify that tables have been created
You should see a list of tables
For example for this model:
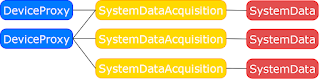
Edit supervisor/models.py
Check this link if you want to play with your model with the django shell.
and enter the user name (e.g. 'admin'), an email address for this user and a password twice. Verify :
and open 127.0.0.1/admin and log yourself.
Installation instructions
Django
sudo pip install django
PostgreSQL
sudo apt-get install postgresql postgresql-client postgresql-server-dev-9.4 [pgadmin3]Install database binding for django :
sudo apt-get install python-dev # necessary to compile the binder
sudo pip install psycopg2
Configuration
Database access
Add a demo user from shell and set its password to 'user'sudo adduser spvuser
Log into postgres and create a database for that user
sudo -u postgres psql
postgres=# CREATE USER spvclient WITH PASSWORD 'user';
postgres=# CREATE DATABASE spvdatabase OWNER spvclient ;
postgres=# \q
Check that the new database is accessible
psql -d spvdatabase -U spvuser
spvdatabase=> \q # quit
Finally, edit postgres configuration file
sudo nano /etc/postgres/main/9.4/pg_hba.conf
Replace ident or peer with trust
local all all trust
Develop your own site
Create project
django-admin startproject poc_supervisor
Run server (default: 127.0.0.1:8000) :
python manage.py runserver
Ctrl+C to quit
Create an app (let's call it supervisor):
python manage.py startapp supervisor
Edit supervisor/apps.py (app generic configuration information):
from django.apps import AppConfig

class SupervisorConfig(AppConfig):
    name = "supervisor"
   verbose_name = "POC 5.5 Supervision interface"
[cd supervisor]
Create a view
- edit views.pyfrom django.http import HttpResponse
def index(request):
return HttpResponse("Hello, world. You're at the polls index.")
- create a file named urls.py with the following code to map view to URL
from django.conf.urls import url
from . import views

urlpatterns = [
    # ex: /supervisor/
    url(r'^$', views.index, name='index'),
]
[cd ..]
- edit poc_supervisor/urls.py to point new view to root
from django.conf.urls import include, url
from django.contrib import admin

urlpatterns = [
    url(r'^supervisor/', include('supervisor.urls')),
    url(r'^admin/', admin.site.urls),
]
- Verifypython manage.py runserver
and open 127.0.0.1:8000/supervisor
Django Database settings
Edit poc_supervisor/settings.py and replace existing DATABASES descriptor with :DATABASES = {
'default' : {
'ENGINE' : 'django.db.backends.postgresql_psycopg2',
'NAME' : 'spvdatabase',
'USER' : 'spvuser',
'PASSWORD': 'user',
'HOST' : '',
}
}
Generate database tables for all INSTALLED_APPS
python manage.py migrate
Verify that tables have been created
psql -d spvdatabase -U spvuser
spvdatabase=> \dt
You should see a list of tables
public | auth_group | table | spvuser
public | auth_group_persmissions  | table | spvuser

...

public | django_session | table | spvuser
spvdatabase=> \q # quit
Create a database model for your app
For example for this model:

Edit supervisor/models.py
    from django.db import models


    # Create your models here.


    ##############################

    ################
    #
    # Custom validators
    #
    ##############################################
    def isStatusValid(value):
      """
      Checks the validity of SystemData status field
      """
      valid_status_list = ['DEFAULT', 'NORMAL', 'NOT_AVAILABLE', 'NO_DEVICE', 'PROTOCOL_ERROR']
      isValid = False
      if value in valid_status_list:
        isValid = True

      return isValid

    class DeviceProxy(models.Model):
        name = models.CharField(max_length=64, unique=True)
        description = models.TextField()
        ip_address = models.IPAddressField()
        subnet_mask = models.IPAddressField()
        port = models.IntegerField(default=47808)

        def __str__(self):
          return self.name + " (%s)"%self.ip_address

    class SystemData(models.Model):
        identifier = models.IntegerField(primary_key=True)
        description = models.CharField(max_length=64, unique=True)
        resolution = models.DecimalField(max_digits=3, decimal_places=3)
        unit = models.CharField(max_length=10)

        def __str__(self):
          return self.identfier + " : %s"%self.description

    class SystemDataAcquisition(models.Model):
        # Delete all system data that belongs to deleted device proxy
        device_proxy = models.ForeignKey(DeviceProxy, on_delete=models.CASCADE)
        identifier = models.ForeignKey(SystemData, on_delete=models.CASCADE)

        timestamp = models.DateTimeField()
        status = models.CharField(max_length=32, validators=[isStatusValid])
        value = models.DecimalField(max_digits=10, decimal_places=2)

        def __str__(self):
          return self.identifier + " = %s %s"%(str(self.value), self.unit)
Add your app to INSTALLED_APPS in poc_supervisor/settings.py:
INSTALLED_APPS = (
    'supervisor.apps.SupervisorConfig',
    ...
Activate your model
python manage.py makemigrations supervisor
python manage.py migrate
Check this link if you want to play with your model with the django shell.
Add an administration interface
python manage.py createsuperuser
and enter the user name (e.g. 'admin'), an email address for this user and a password twice. Verify :
python manage.py runserver
and open 127.0.0.1/admin and log yourself.
Add administration option on database entries
Edit supervisor/admin.pyfrom .models import SystemData, DeviceProxy admin.site.register(SystemData)br /> admin.site.register(DeviceProxy)Run verification step again.
Monday, December 21, 2015
Python : Metaclass
Classes are objects
"In Python, everything is an object"
That applies for classes as well which means that classes:
- can be created at runtime
- passed as paramters
- returned from funtions
- assigned to variables
Builtin type function
The simplest way to create class dynamically is to use type :
def create_klass(name, **kwattrs):
return type(name, (object,), dict(**kwattrs))
>> my_test_klass = create_klass('MyTestClass', id=0, counter=0)
>> my_test_klass
<class __main__.MyTestClass>
>> mtk = my_test_klass()
>> mtk
<__main__.MyTestClass object at 0x01F8C150>
>> mtk.id, mtk.counter
(1, 0)
my_test_klass is equivalent to
class MyTestClass(object):
id = 1
counter = 0
Created at runtime, returned from a function and assigned to a variable.
Class of class
Wait a minute, if everyting is an object, it would mean that my_test_klass is an instance
of a class as well... In Python, you can check the type of a class with __class__ attribute,
let's do some tests :
>> mtk.__class__
<class __main__.MyTestClass>
>> my_test_klass.__class__
>> <type 'type'>
So type is the class of Python classes.
Metaclass
Any class whose instances are themselves classes, is a metaclass.
It means that type is a metaclass : yes, the default one. We will see later how to create our own metaclasses.
When Python parses your script, it runs a routine when detecting the class keyword thats will
collect the attributes and methods into a dictionary. When the class definition is over, python determines the metaclass of the class. Let's call it Meta. At this moment, python executes Meta(name, bases, dct) where :
- Meta is the metaclass, so this invocation is instantiating it
- name is the name of the newly created class
- bases is a tuple of the class's base classes
- dct maps attribute names to objects, listing all of the class's attributes
A metaclass is defined by setting a __metaclass__ attribute to either a class or one of its bases.
The following class has metaclass definition :
class MyExampleClass(object):
age = 30
so type is used instead and we can create this class dynamically with the following line of code :
MyExampleClass = type('MyExampleClass', (object,), {'age' : 30})
But if it has been defined like this :
class MyExampleClass(object):
__metaclass__ = MetaPerson
age = 30
the creation would have been done with :
MyExampleClass = MetaPerson('MyExampleClass', (object,), {'age' : 30})
__new__ and __init__
To control the creation and initialization of the class in the metaclass, you can implement the metaclass's __new__ (to control the creation of the object) and __init__ (to control the instanciation of the object) methods.
The call to MetaPerson implicitely executes the following operations :
MyExampleClass = MetaPerson.__new__(MetaPerson, 'MyExampleClass', (object,), {'age' : 30})
MetaPerson.__init__(MetaPerson, 'MyExampleClass', (object,), {'age' : 30})
Concretely, with :
class MetaPerson(type):
def __new__(meta, name, bases, dct):
print '-----------------------------------'
print "Allocating memory for class", name
print meta
print bases
print dct
return super(MetaPerson, meta).__new__(meta, name, bases, dct)
def __init__(cls, name, bases, dct):
print '-----------------------------------'
print "Initializing class", name
print cls
print bases
print dct
super(MetaPerson, cls).__init__(name, bases, dct)
python will print :
-----------------------------------
Allocating memory for class MyKlass
<class '__main__.MetaPerson'>
(<type 'object'>,)
{'barattr': 2, '__module__': '__main__',
'foo': <function foo at 0x00B502F0>,
'__metaclass__': <class '__main__.MetaPerson'>}
-----------------------------------
Initializing class MyKlass
<class '__main__.MyKlass'>
(<type 'object'>,)
{'barattr': 2, '__module__': '__main__',
'foo': <function foo at 0x00B502F0>,
'__metaclass__': <class '__main__.MetaPerson'>}
when parsing the fllowing class definition (done at module import only):
class MyKlass(object):
__metaclass__ = MetaPerson
def foo(self, param):
pass
barattr = 2
Inherited metaclass
A very common error when dealing with metaclasses is the following error code :
TypeError: metaclass conflict: the metaclass of a derived class must be a (non-strict) subclass of the metaclasses of all its bases
It happens with the following scheme when the identification of the metaclass fails.
Check the example below :
>>> class M_A(type):
... pass
>>> class M_B(type):
... pass
>>> class A(object):
... __metaclass__=M_A
>>> class B(object):
... __metaclass__=M_B
>>> class C(A,B):
... pass
Traceback (most recent call last):
File "<stdin>", line 1, in ?
TypeError: metaclass conflict: the metaclass of a derived class must be a (non-strict) subclass of the metaclasses of all its bases
Python is lost because it does not know what is the metaclass of C : is it M_A or M_B ?
To get around this issue, the solution is to create a metaclass that inherits from both M_A and M_B. It will ensure C to have a unique and identifiable metaclass :
M_A M_B
: \ / :
: \ / :
A M_C B
\ : /
\ : /
C
which in terms of code is :
>>> class M_C(M_A,M_B): pass
...
>>> class C(A,B):
... __metaclass__=M_C
>>> C,type(C)
(<class 'C'>, <class 'M_AM_B'>)
Automatic metaclass resolution
If you are planning to code a complex class factory and you're preparing to face metaclass conflict errors, know that out there, there is a generic metaclass creator for your classes :
http://code.activestate.com/recipes/204197-solving-the-metaclass-conflict/
Tuesday, December 15, 2015
Python : filter(), map() and reduce()
filter(), map() and reduce() tools are functional programming methods that can be
applied to iterable objects.
Usually, lambda functions are used for <function>. A lambda function returns True when the condition is met (example : lambda x: x <= 10).
values = range(100)
print filter(lambda x: x < 50, values)
# prints [0, 1, 2, 3, ..., 49]
print filter(lambda x: x > 50, values)
# prints [51, 52, 53, ..., 100]
print filter(lambda x: x%2 == 0)
# prints [0, 2, 4, ..., 100]
cities = ['paris', 'london', 'berlin']
print map(lambda n: n.upper(), cities)
# prints ['PARIS', 'LONDON', 'BERLIN']
Recursive process : at each step, passes the current operation result with the next item from the list.
By default, the first item in the list initializes the first operation result.
Note : reduce takes two parameters
print reduce(lambda x,y: x*y, [1,2,3,4])
# prints 24
# 1st cycle : multiplies 1 (first element) with 2
# 2nd cycle : multiplies 2 (result of previous operation) with 3 (next element)
# 3rd cycle : multiplies 6 (result of previous operation) with 4 (next element)
applied to iterable objects.
filter(<function>, <object>)
Iterates on object and returns the list of elements from <object> for which <function> returned True.Usually, lambda functions are used for <function>. A lambda function returns True when the condition is met (example : lambda x: x <= 10).
values = range(100)
print filter(lambda x: x < 50, values)
# prints [0, 1, 2, 3, ..., 49]
print filter(lambda x: x > 50, values)
# prints [51, 52, 53, ..., 100]
print filter(lambda x: x%2 == 0)
# prints [0, 2, 4, ..., 100]
map(<function>, <object>)
Applies a function to every element of a list and returns the modified list.cities = ['paris', 'london', 'berlin']
print map(lambda n: n.upper(), cities)
# prints ['PARIS', 'LONDON', 'BERLIN']
reduce(<function>, <list>)
Recursive process : at each step, passes the current operation result with the next item from the list.
By default, the first item in the list initializes the first operation result.
Note : reduce takes two parameters
print reduce(lambda x,y: x*y, [1,2,3,4])
# prints 24
# 1st cycle : multiplies 1 (first element) with 2
# 2nd cycle : multiplies 2 (result of previous operation) with 3 (next element)
# 3rd cycle : multiplies 6 (result of previous operation) with 4 (next element)
Subscribe to:
Posts (Atom)


