Friday, April 7, 2017

WCE7 : Read CPU registers on BeagleBone

Sometimes, it may be useful to watch the CPUs registers to confirm that a peripheral is configured properly or to monitor a signal change from the CPU point of view.
Here are some hints to achieve that easily.

Monitor MPU registers

MPU is the central processing unit in charge of interrupt handling. To read its registers, use the following code:
#include "am33x_irq.h" 
#include <am33x_interrupt_struct.h>

// Interrupt context
static AM33X_INTR_CONTEXT  s_intr;
AM33X_INTR_CONTEXT const *g_pIntr = &s_intr;

void somefunction(void)
{
   UINT32                        irqSIR, irqINTC_ITR_3, irqPENDING_IRQ3;
   PHYSICAL_ADDRESS pa;

   // Get interrupt controller and GPIO registers' virtual uncached addresses
    pa.QuadPart = GetAddressByDevice(AM_DEVICE_MPU);
    s_intr.pICLRegs = (AM33X_INTC_MPU_REGS*)MmMapIoSpace(pa, sizeof(AM33X_INTC_MPU_REGS), FALSE);
    if (s_intr.pICLRegs == NULL)
    {
        DEBUGMSG(1, (L"ERROR: Am3xxGpioInit: Failed map MPU controller registers\r\n"));
    }

    irqSIR = INREG32(&g_pIntr->pICLRegs->INTC_SIR_IRQ);
    irqINTC_ITR_3 = INREG32(&g_pIntr->pICLRegs->INTC_ITR3);
    irqPENDING_IRQ3 = INREG32(&g_pIntr->pICLRegs->INTC_PENDING_IRQ3);

    // Activate IRQs for GPIO0A
    //OUTREG32(&g_pIntr->pICLRegs->INTC_ILR[96], 0U); // Route to IRQ and set max priority
    //OUTREG32(&g_pIntr->pICLRegs->INTC_MIR3, irqMIR3 | 0x1);
}


Monitor GPIO registers

#include "am33x_irq.h" 
#include <am33x_interrupt_struct.h>

// Interrupt context
static AM33X_INTR_CONTEXT  s_intr;
AM33X_INTR_CONTEXT const *g_pIntr = &s_intr;

void  somefuncion(void)
{
    PHYSICAL_ADDRESS pa;

    // Bank 0
    pa.QuadPart = GetAddressByDevice(AM_DEVICE_GPIO0);
    s_intr.pGPIORegs[0] = (AM3XX_GPIO_REGS*)MmMapIoSpace(pa, sizeof(AM3XX_GPIO_REGS), FALSE);
    if (s_intr.pGPIORegs[0] == NULL)
    {
        DEBUGMSG(1, (L"ERROR: Am3xxGpioInit: Failed map GPIO0 controller registers\r\n"));
    }
    // Bank 1
    pa.QuadPart = GetAddressByDevice(AM_DEVICE_GPIO1);
    s_intr.pGPIORegs[1] = (AM3XX_GPIO_REGS*)MmMapIoSpace(pa, sizeof(AM3XX_GPIO_REGS), FALSE);
    if (s_intr.pGPIORegs[1] == NULL)
    {
        DEBUGMSG(1, (L"ERROR: Am3xxGpioInit: Failed map GPIO1 controller registers\r\n"));
    }
    // Bank 2
    pa.QuadPart = GetAddressByDevice(AM_DEVICE_GPIO2);
    s_intr.pGPIORegs[2] = (AM3XX_GPIO_REGS*)MmMapIoSpace(pa, sizeof(AM3XX_GPIO_REGS), FALSE);
    if (s_intr.pGPIORegs[2] == NULL)
    {
        DEBUGMSG(1, (L"ERROR: Am3xxGpioInit: Failed map GPIO2 controller registers\r\n"));
    }
    // Bank 3
    pa.QuadPart = GetAddressByDevice(AM_DEVICE_GPIO3);
    s_intr.pGPIORegs[3] = (AM3XX_GPIO_REGS*)MmMapIoSpace(pa, sizeof(AM3XX_GPIO_REGS), FALSE);
    if (s_intr.pGPIORegs[3] == NULL)
    {
        DEBUGMSG(1, (L"ERROR: Am3xxGpioInit: Failed map GPIO3 controller registers\r\n"));
    }
}

OALPAtoUA vs MmMapIoSpace

Both functions achieve the same goal so why use one instead of the other ?
OALxAtoxA functions are reserved for OAL use and can not be called from drivers (if you try, you will end with a link error saying that OALPAtoVA symbol has not been found). This is also why some parts of code use the following code:
#ifdef OAL
   // OALxAtoxA business
#endif
#ifdef DEVICE
  // MmMapIoSpace business
#endif
MmMapIoSpace is the function to use in drivers.

Thursday, April 6, 2017

WCE7 : Setup tools to tweak the BSP

The following tools need to be installed (in this order):
  • Visual Studio 2008 Professional ENU
  • Visual Studio 2008 Professional SP1
  • Windows Compact 7 : Be sure to check Platform Builder option ! Don't install the binaries for all hardware architecture. Instead, pick ARMv7 only.

Note: You need to a valid license ! If this is the first use, you can register on Microsoft Windows Embedded Compact 7 web page and get a 180 days demo license.


OS Customization tools

AutoLaunch4ce

Install Autolaunch v310 (also available in the network directory or downloadable here).
Add to your OS Design from Catalog View, in Third Party->Embedded101->Check all checkboxes but CoreCon. It seems that when started from the AutoLaunch, the deployment speed slows down significantly.
AutoLaunch is a an executable that will start automatically at boot. It will look in registry for executables to run at OS startup.
The following lines will be automatically added to your OS image to start CoreCon and remote display (cerdisp) automatically at startup:
[HKEY_LOCAL_MACHINE\Startup]
    "Process0"="ConmanClient2.exe"     
    "Process0Delay"=dword:1388
    "Process1"="cerdisp -c" 
    "Process1Delay"=dword:2710

The startup delay can be modified to any value (0 included).
If other applications need to be started at boot, simply add them like that:
[HKEY_LOCAL_MACHINE\Startup]
    "Process2"="App_01.exe" 
    "Process2Delay"=dword:3A98
    "Process3"="App_02.exe" 
    "Process3Delay"=dword:4E20

Note: Process0 and Process1 are reserved to CoreCon and remote display. Do not use them for other applications.
Known Issue: If you are running under a french operating system, the postlink.bat script located in autolaunch project will not complete due to a path issue. You will end with a missing file (DeviceAgentTransport.dll in my case) in the global output result.

To resolve this issue, replace
"%Program Files%/Common files"
string with
%COMMONPROGRAMFILES%
in postlink.bat. If you program files directory is named
"Program Files (X86)"
, use this replacement string instead:
%COMMONPROGRAMFILES(x86)%
. Re-launch the build.


Credits

http://www.embedded101.com/Blogs/SamuelPhung/entryid/207/Compact-7-Getting-Started-Part-3-Develop-an-OS-Design

WCE7 : BeagleBone Black boot procedure

In a previous article, we described how windows CE theoretically boots. Now, we will focus on BBB's community BSP.

Release files

A release of BBB Windows CE includes 3 files:
  • MLO
  • ebootsd.nb0
  • nk.bin
The three of them are generated by ROMIMAGE (which means that they all have their own TOC).

MLO

This file must be the first file copied to the SD card after being formated.
Behind this name hides an XLDR loader executable small enough to fit into the 63kb of CPU's internal RAM.
In fact, this is the line that generates MLO:
copy /b $(_SRC)\xldrtocsd.raw + $(_TGT)\xldrsd.nb0 $(_TGT)\MLO
A pre-built binary (xldrtocsd.raw) is combined with the result of XLDR build into MLO.
Basically, MLO will initialize the strict minimum on the CPU to be able to copy the ebootsd.nb0 to external RAM.
Here is a complete overview of what XLDR does :

Eboot

Eboot is the standard bootloader of Windows CE. It is customized here to the BBB platform.
It initializes much more peripherals and offers to user an input to configure the boot settings.
Once configured, the boot arguments are saved to IMAGE_SHARE_ARGS_PA memory address so that the operating system can read them.
At the end of processing, all peripherals are turned off by disabling their clock.
Basically, eboot will load nk.bin to external RAM.
Here is a complete overview of what eboot does :

NK.bin

This is the complete image of Windows CE including OAL, kernel.dll and other system binaries.
The startup procedure is similar to eboot. An important part of the boot is not provided in BBB BSP project (kernel.dll) but it is linked from a pre-built binary. With this undefined part, here is what the nk.bin boot procedure looks like :

Saturday, March 25, 2017

Interfacing eMMC

The eMMC is a cheap storage stolution that is very common in embedded systems. It is made of NAND flash memory and a controller.
An eMMC can be used as boot memory when the on-chip ROM code is not sufficient (typically with platforms like linux, windows CE). This is how I had to use it lately, on the popular BeagleBone Black. I struggled a little bit because of the complexity of the protocol (see JEDEC) and because of the differences with the SD card that can also be used as a boot device on the BBB.

SD/SDIO/MMC ...

The first confusing thing comes from the abbreviations related to this type of memory.

  • SD : "Secure Digital", is a non volatile memory developed by the SD Card Association (SDA)
  • SDIO : "Secure Digital Input/Output" is an extension of the SD specification to support IO devices on the SD card slot (GPS, modem, ...)
  • MMC : "MultiMediaCard" is a memory card that can be used by a system that supports SD cards. EMMC is a variant of MMC with a different form factor. Instead of a removable card, it is a soldered chip on the electronic board.

What about SDHC ?

"Secure Digital High Capacity" identifies cards with 4 to 32 Gb storage space.

And UHS ?

"Ultra High Speed" bus. Different classes exist to specify the bus speed characteritics. These classes have nothing to do with the command classes that are used in the protocol.

Connectivity

The communication between host and SD uses 1 command line, [1-8] data lines and 1 clock line. The command line is basically used to read/write the registers of the card controller or to start/stop a read/write operation on the card memory. Data lines are used to read/transmit data following a read/write command.

Protocol

  • Host sends a command serially on command line
  • Card gives a response on the command line
  • Data is transferred on data lines if necessary
  • Card holds the data 0 line low to indicates that it is busy processing the received data
  • If data has been transferred, a CRC status is sent back by the card at the end of transmission on data 0 line

There are 2 types of data transfer:
  • Sequential (only with single data line)
  • Block-oriented

The sequential transfer consists in sending data continuously on data line until a stop command is sent on command line.

The block-oriented transfer data block plus CRC on data lines. The transfer is stopped when a stop command is sent on the command line or when all block have been sent if CMD23 has been used before the start of transmission.


 Data format

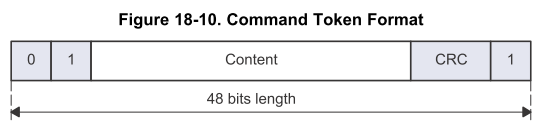
A command is a 48 bits frame.


The format of a response frame depends on the command. There are 6 types of responses (R1, R2, ..., R6).


Finally, the data transmission scheme depends on the number of data lines.

Card registers

The following registers can be accessed by the host:

  • OCR : Operating Conditions Register. Defines the voltage profile of the card and provides some status bits.
  • CID : Card Identification Register. Contains manufacturer information as well as a unique identification number (assigned by JEDEC)
  • CSD : Card Specific Data Register. Defines the data format, timings, etc. Some of these values can be modified by issuing a CMD27. There is an extended version of this register for high capacity (SDHC) cards.
  • RCA : Relative Card Address Registers. It carries the card address that is published during identification. 
  • DSR : Driver Stage Register. It can be optionnally used to improve the bus performances.
  • SCR : SD Card Configuration Register. It gives information about the special features implemented into a specific card.

Commands

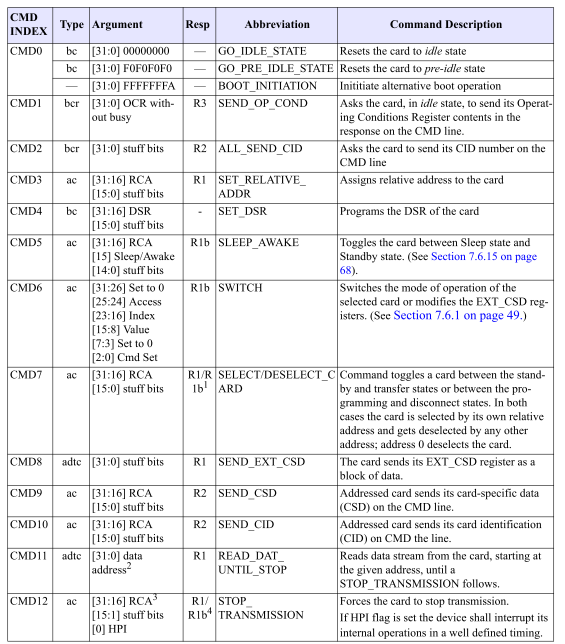
The JEDEC defines a set of commands that are identified with a number (CMD0, CMD1, ...). Each of these commands achieves a specific action : CMD0 (GO_IDLE_STATE) resets the card to the Idle state. Although this set of command is available for SD and MMC, their usage differs depending on the type of card. For instance, CMD6 (SWITCH) is not used in a similar way. The full list of commands is available in JEDEC document, here are some of them (specified for the eMMC).

What is R1b type of response ?

R1b has exactly the same format as R1. "b" stands for busy and it indicates that a busy signal can be sent on data 0 line, as explained above. This busy signal is however optional.

Booting from eMMC

Depending on the operations done at boot on the SD interface, the card will switch to differents states.

Commonly, boot option 1 is used.
At the end of this diagram, with or without boot enabled, the card enters Standby state.The diagram below show how to switch to Transfer state (or back to Standby state from another state).

Sources:

  • TI AM335x reference manual
  • TN2918 of Micron

Wednesday, May 11, 2016

Python : else clause on loop

In python, like in several other languages, break and continue statements exist to control execution flow. But when it comes to else, it is something new :

for item in itemList:
    if item == 'DeveloperLogBook':
        print 'Item found'
        break

else:
    print 'Item not found !'

On the example above, else applies to for loop if it terminates "through exhaustion of the list".

Note: With a while loop, else applies if the condition assertion of while is false.


Python : django 1.8 + Restful api + ExtJs 6

This article follows the basic steps to quickly create an application server with django and a PostgreSQL database. It will explain how to integrate ExtJs into a django project and will show some examples of templating.

Install django dependencies

sudo pip install django-filter djangorestframework django-rest-auth django-registration

Generate views and routes to handle the following HTTP requests :

  • GET /api/deviceproxy (get a list of all device proxies)
  • POST /api/deviceproxy (add a new device proxy)
  • OPTIONS /api/deviceproxy (get meta-information of the DeviceProxy model)
 Edit poc_supervisor/settings.py  and add the following lines to INSTALLED_APPS :

...
'rest_framework',
'rest_framework.authtoken',
'rest_auth',
...


 and add the Rest configuration :

REST_FRAMEWORK = {
    # Use hyperlinked styles by default.
    # Only used if the `serializer_class` attribute is not set on a view.
    'DEFAULT_MODEL_SERIALIZER_CLASS':
    'rest_framework.serializers.HyperlinkedModelSerializer',
    'DEFAULT_AUTHENTICATION_CLASSES': (
        'rest_framework.authentication.SessionAuthentication',
    ),

    # Use Django's standard `django.contrib.auth` permissions,
    # or allow read-only access for unauthenticated users.
    'DEFAULT_PERMISSION_CLASSES': [
        'rest_framework.permissions.DjangoModelPermissions',
    ],

    'PAGINATE_BY_PARAM': 'limit',
    'ORDERING_PARAM': 'sort',
    'PAGINATE_BY': 10,
    'MAX_PAGINATE_BY': 100,
    'DEFAULT_FILTER_BACKENDS': [
        'rest_framework.filters.DjangoFilterBackend',
        'rest_framework.filters.OrderingFilter',
    ],
}

LOGIN_REDIRECT_URL = '/api/' 

Update your django app

When we followed the django tutorial, we created a basic view in views.py and a url conf in urls.py. Remove both files and add a rest.py file instead with the following code :

from rest_framework import viewsets, routers, serializers
from supervisor.models import DeviceProxy, SystemData, SystemDataAcquisition

#
# This file holds the REST related code
#

#################################################################################
#
#
#  SERIALIZERS : The serializers specify how the records are serialized in the
#                list or detail-views
#
#
#################################################################################
class DeviceProxySerializer(serializers.HyperlinkedModelSerializer):
    class Meta:
        model = DeviceProxy
        fields = ('name', 'description', 'ip_address', 'subnet_mask', 'port',)

class SystemDataSerializer(serializers.HyperlinkedModelSerializer):
    class Meta:
        model = SystemData
        fields = ('identifier', 'description', 'resolution', 'unit',)

class SystemDataAcquisitionSerializer(serializers.HyperlinkedModelSerializer):
    class Meta:
        model = SystemData
        fields = ('device_proxy', 'identifier', 'timestamp', 'status', 'value',)

#################################################################################
#
#
#  FILTERS : Use filters to retsrict items returned by querysets (RFU)
#
#
#################################################################################


#################################################################################
#
#
#  VIEWSETS : Controllers for incoming requests. They access the model and return
#             the proper output
#
#
#################################################################################
class DeviceProxyViewSet(viewsets.ModelViewSet):
    queryset = DeviceProxy.objects.all()
    serializer_class = DeviceProxySerializer
    # filter_class =


class SystemDataViewSet(viewsets.ModelViewSet):
    queryset = SystemData.objects.all()
    serializer_class = SystemDataSerializer
    # filter_class =

class SystemDataAcquisitionViewSet(viewsets.ModelViewSet):
    queryset = SystemDataAcquisition.objects.all()
    serializer_class = SystemDataAcquisitionSerializer
    # filter_class =

#################################################################################
#
# Register viewsets to REST router
#
#################################################################################
def register(restrouter):
    restrouter.register(r'deviceproxy', DeviceProxyViewSet)
    restrouter.register(r'systemdata', SystemDataViewSet)
    restrouter.register(r'SystemDataAcquisition', SystemDataAcquisitionViewSet) 


Update your project url settings (urls.py)
Replace the content with the following one :

from django.conf.urls import patterns, include, url
from django.contrib import admin
from rest_framework import viewsets, routers
from supervisor import rest as supervisorAPI

#
# This url pattern definition is the REST-specific one
#
# admin ui
admin.autodiscover()

# routers for the rest-api
restrouter = routers.DefaultRouter()

# add api-router for the supervisor application
supervisorAPI.register(restrouter)

# root-level url patterns
urlpatterns = patterns('',
    # frontpage
    #url(r'^', include('frontend.urls')),
    # admin-ui
    url(r'^admin/', include(admin.site.urls)),
    # provide a login-link in the browsable api
    url(r'^api/ui-auth/', include('rest_framework.urls', namespace='rest_framework')),
    # login for rest-api 
    #url(r'^api/auth/', include('rest_auth.urls')),
    # login for rest-api
    #url(r'^api/', include('frontend.apiurls')),
    # base for the browsable rest-api
    url(r'^api/', include(restrouter.urls)),
)

Note 1: Do not mind the commented code for the moment, we will see that later
Note 2: Beware of the urlpatterns definition : the function named patterns is now called. Do not forget it or you will have this error : AttributeError: 'str' object has no attribute 'resolve'
Note 3: Do not forget the trailing slash in regex definitions or you will encounter url resolution errors


Finally, migrate your app :

python manage.py migrate


Verify that REST operation are activated


Run the server and go to http://127.0.0.1/api/

Normally, you should see a Django REST framework page. You should be able to log in as well with your predefined admin account.

Add an ExtJS frontend


 ExtJS is a standalone MVC framework which means that, event for the creation of views (no model), we will need to create a new django app to host ExtJS stuff.

python manage.py startapp frontend


Open to frontend/views.py and add this content in it

from django.http import HttpResponse
from django.shortcuts import render
from django.views.decorators.csrf import ensure_csrf_cookie
import json

# Create your views here.

@ensure_csrf_cookie
def index(request):
    return render(request, 'frontend/index.html')

def permissions(request):
    print request.user.user_permissions.all()
    return HttpResponse(json.dumps(
        {
            'is_superuser': request.user.is_superuser,
            'user_permissions': list(map(lambda x:str(x.codename), request.user.user_permissions.all()))
        }

    ), 'applicative/json')


This piece of code is the very basic definition for your index file.
Now open frontend/urls.py and add this piece of code


from django.conf.urls import patterns, url

from frontend import views

urlpatterns = patterns('',
    url(r'^$', views.index, name='index'),
)

Create frontend/apiurls.py file and add the following code in it

from django.conf.urls import patterns, url
from frontend import views

urlpatterns = patterns('',
    url(r'^auth/permissions/$', views.permissions, name='permissions'),
) 


 Ok, we need now to define this app in the projects. Add the name of the app in INSTALLED_APPS in poc_supervisor/settings.py :


...
'supervisor',
'frontend',
...


And uncomment these lines in poc_supervisor/urls.py


...
url(r'^', include('frontend.urls')),
url(r'^api/auth/', include('rest_auth.urls')),
url(r'^api/', include('frontend.apiurls')),
... 


At this moment, you can run your server and try to open http://127.0.0.1/ which will end with a 404 error. Why ? Because the index.html file has not been defined ! This time, instead of creating a basic 'Hello World' html page, we will use django templates to create a default ExtJS model (v6.0.0) that we will inherit in our frontend index page. Huh ?! Yeah yeah, let's go through the following steps :

ExtJs setup

Download ExtJs


https://www.sencha.com/legal/gpl/

Create ExtJs directories

At the root of your project (where manage.py is located) :

mkdir static

mkdir templates

static will contain project-wide static files, like CSS, JavaScript.
templates will store project-wide HTML templates. We will use it to store a generic template with a pre-defined header with extjs inclusion.

Unzip extjs archive to static directory

unzip ext-6.0.0-gpl.zip -d static/

Configure Django


Edit poc_supervisor/settings.py and add the following lines

Add static directory to django project

STATICFILES_DIRS = [
    os.path.join(BASE_DIR, 'static')
    ]


Add templates directory to django project

TEMPLATES = [
    {
        'BACKEND': 'django.template.backends.django.DjangoTemplates',
        'DIRS': [
                os.path.join(BASE_DIR, 'templates')
        ],
    ....


Create a base.html file in poc_supervisor/templates and add the following code :

 <!-- Do NOT put any DOCTYPE here unless you want problems in IEs. -->
<html>
    <head>
        <meta http-equiv="X-UA-Compatible" content="IE=edge">
        <meta http-equiv="Content-Type" content="text/html; charset=utf-8">
        <!-- Importing Extjs library -->
        <script type="text/javascript" src="/static/ext-6.0.0/build/ext-all-debug.js"></script>
        <script type="text/javascript" src="/static/ext-6.0.0/build/classic/theme-triton/theme-triton-debug.js"></script>

        <!-- Importing the stylesheet triton -->
        <link rel="stylesheet" type="text/css" href="/static/ext-6.0.0/build/classic/theme-triton/resources/theme-triton-all-debug.css">

        {% block head %}{% endblock %}
    </head>

    <body>
        {% block content %}{% endblock %}
    </body>
</html> 


Now let's create an template named index.html in frontend/templates/frontend/ with the following code in it :

{% extends "base.html" %}

{% block title %}Hello ExtJS Supervisor{% endblock %}

{% block head %}

    <script type='text/javascript' src='/static/frontend/app.js'></script>

{% endblock %}

{% block content %}

{% endblock %}


As you can see, index.html will inherit base.html and call a javascript file 'app.js' which will handle the form creation for us. We will first create a simple window to make sure everything works as expected.

Create frontend/static/frontend/app.js file with the following code
Ext.application({
    name: 'Supervisor',
    launch : function() {
        var win = Ext.create("Ext.window.Window", {
        title: 'My first window',
        width: 300,
        height: 200,
        maximizable: true,
        html: 'this is my first window'
        });
    win.show();
    }
});


Finally, edit the index function that we've created before in supervisor/views.py : 

from django.shortcuts import render_to_response

def index(request):
      return render_to_response('supervisor/index.html')


Ok, now run your server and you should see a nice looking window displayed ! Otherwise, double check your ext-js includes.


The next steps are to customize your view with ExtJS !


Credits


https://github.com/MaZderMind/django-vs-extjs

Python : django 1.8 + PostgreSQL shortened tutorial

This article is a compressed version of the first 2 chapters of django official tutorial. It does not explain anything but simply goes through the basic procedures to create a application server in a short time.

Installation instructions


Django 

sudo pip install django

PostgreSQL 

sudo apt-get install postgresql postgresql-client postgresql-server-dev-9.4 [pgadmin3]
Install database binding for django : 

sudo apt-get install python-dev # necessary to compile the binder
sudo pip install psycopg2

Configuration


Database access

Add a demo user from shell and set its password to 'user' 

sudo adduser spvuser


Log into postgres and create a database for that user 

sudo -u postgres psql
postgres=# CREATE USER spvclient WITH PASSWORD 'user';
postgres=# CREATE DATABASE spvdatabase OWNER spvclient ;
postgres=# \q

Check that the new database is accessible 

psql -d spvdatabase -U spvuser
spvdatabase=> \q # quit


Finally, edit postgres configuration file

sudo nano /etc/postgres/main/9.4/pg_hba.conf

Replace ident or peer with trust 

local all all trust

Develop your own site

Create project 

django-admin startproject poc_supervisor

Run server (default: 127.0.0.1:8000) : 

python manage.py runserver

Ctrl+C to quit

Create an app (let's call it supervisor):

python manage.py startapp supervisor


Edit supervisor/apps.py (app generic configuration information):

from django.apps import AppConfig

class SupervisorConfig(AppConfig):
    name = "supervisor"
   verbose_name = "POC 5.5 Supervision interface"
  
[cd supervisor]

Create a view

- edit views.py

from django.http import HttpResponse


def index(request):
    return HttpResponse("Hello, world. You're at the polls index.")

 - create a file named urls.py with the following code to map view to URL 

from django.conf.urls import url
from . import views

urlpatterns = [
    # ex: /supervisor/
    url(r'^$', views.index, name='index'),
]

[cd ..]


  - edit poc_supervisor/urls.py to point new view to root 

from django.conf.urls import include, url
from django.contrib import admin

urlpatterns = [
    url(r'^supervisor/', include('supervisor.urls')),
    url(r'^admin/', admin.site.urls),
]
 
- Verify

python manage.py runserver

and open 127.0.0.1:8000/supervisor


Django Database settings

Edit poc_supervisor/settings.py and replace existing DATABASES descriptor with : 
DATABASES = {

'default' : {
         'ENGINE' :  'django.db.backends.postgresql_psycopg2',
         'NAME' : 'spvdatabase',
         'USER' : 'spvuser',
         'PASSWORD': 'user',
         'HOST' : '',
    }
}

Generate database tables for all INSTALLED_APPS 
 
python manage.py migrate

Verify that tables have been created 
 
psql -d spvdatabase -U spvuser
spvdatabase=> \dt

You should see a list of tables 
public | auth_group | table | spvuser
public | auth_group_persmissions  | table | spvuser

...

public | django_session | table | spvuser


spvdatabase=> \q # quit

Create a database model for your app


For example for this model:


Edit supervisor/models.py

    from django.db import models


    # Create your models here.


    ##############################

    ################
    #
    # Custom validators
    #
    ##############################################
    def isStatusValid(value):
      """
      Checks the validity of SystemData status field
      """
      valid_status_list = ['DEFAULT', 'NORMAL', 'NOT_AVAILABLE', 'NO_DEVICE', 'PROTOCOL_ERROR']
      isValid = False
      if value in valid_status_list:
        isValid = True
       
      return isValid

    class DeviceProxy(models.Model):
        name = models.CharField(max_length=64, unique=True)
        description = models.TextField()
        ip_address = models.IPAddressField()
        subnet_mask = models.IPAddressField()
        port = models.IntegerField(default=47808)
       
        def __str__(self):
          return self.name + " (%s)"%self.ip_address

    class SystemData(models.Model):
        identifier = models.IntegerField(primary_key=True)
        description = models.CharField(max_length=64, unique=True)
        resolution = models.DecimalField(max_digits=3, decimal_places=3)
        unit = models.CharField(max_length=10)
       
        def __str__(self):
          return self.identfier + " : %s"%self.description
       
    class SystemDataAcquisition(models.Model):
        # Delete all system data that belongs to deleted device proxy
        device_proxy = models.ForeignKey(DeviceProxy, on_delete=models.CASCADE)
        identifier = models.ForeignKey(SystemData, on_delete=models.CASCADE)
       
        timestamp = models.DateTimeField()
        status = models.CharField(max_length=32, validators=[isStatusValid])
        value = models.DecimalField(max_digits=10, decimal_places=2)
       
        def __str__(self):
          return self.identifier + " = %s %s"%(str(self.value), self.unit) 


Add your app to INSTALLED_APPS in poc_supervisor/settings.py:

INSTALLED_APPS = (
    'supervisor.apps.SupervisorConfig',
    ...

Activate your model

python manage.py makemigrations supervisor
python manage.py migrate

Check this link if you want to play with your model with the django shell.

Add an administration interface 

python manage.py createsuperuser

and enter the user name (e.g. 'admin'), an email address for this user and a password twice. Verify :
python manage.py runserver

and open 127.0.0.1/admin and log yourself.

Add administration option on database entries

Edit supervisor/admin.py 
 
from .models import SystemData, DeviceProxy
 

admin.site.register(SystemData)br />
admin.site.register(DeviceProxy)

Run verification step again.

 
biz.