Thursday, April 27, 2017

What is AJAX ?

AJAX = Asynchronous Javascript And Xml

Ajax is not a tehnology by itself but rather a combination of existing technologies (HTML/CSS/DOM/Javascript/XML/JSON).

What is it intended for ?


Ajax is typically used to refresh data on a web page without having to reload the entire page (e.g. asynchronously). It involves a web browser sending HTTP requests (GET/POST)  to server and processing the response to finally manipulate the page DOM (e.g. HTML tags). The user's view is thereby dynamically updated.


As you can see, Ajax requests are executed by Javascript code and the response is also handled in Javascript. The orange part stands on client's side (the web browser).

What if the format of data ?


Originally, it was XML but nowadays, JSON is preferred (JavaScript Object Notation).


Example of ajax requests


jQuery

<script>
...
$.ajax({
        headers: { "X-CSRFToken": getCookie("csrftoken") },
        url: "myurl",
        method: 'POST', // or another (GET), whatever you need
        data: {
            'mydata': 'value', // outgoing data
        },
        
        success: function (data) {        
            // success callback
            // you can process data returned by server here
        }
        });
...
</script> 

Pure javascript

<script type="text/javascript">
function ajaxFunction()
{
var xmlhttp;
if (window.XMLHttpRequest)
  {
  // code for IE7+, Firefox, Chrome, Opera, Safari
  xmlhttp=new XMLHttpRequest();
  }
else if (window.ActiveXObject)
  {
  // code for IE6, IE5
  xmlhttp=new ActiveXObject("Microsoft.XMLHTTP");
  }
else
  {
  alert("Your browser does not support XMLHTTP!");
  }
xmlhttp.onreadystatechange=function()
{
if(xmlhttp.readyState==4)
  {
  document.myForm.time.value=xmlhttp.responseText;
  }
}
xmlhttp.open("GET","time.asp",true);
xmlhttp.send(null);
}
</script>

Monday, April 10, 2017

What is inside a WCE7 BSP

The BSP (Board Support Package) is the layer that will interface the Operating System with the hardware.

It consists of the following items:
  • [Optional] Bootloader
  • OAL (OEM Abstraction layer)
  • KITL to debug the OS in development phase
  • Configuration files that specifies the board (Ex: config.bib for memory settings)
The BSP image is specific to the OS version and to the target hardware architecture.


Bootloader

When powered up, the microprocessor starts executing instructions from a specified memory address located in ROM. This code can contain the entire system for small footprint applications and will run until shutdown.
With WCE7, the system image (nk.bin) needs to be loaded to RAM from a storage disk or network because it can't fit into a ROM memory. In this case, these are the typical steps of a bootloader:
  • Minimal Initialization of the system (memory and com drivers)
  • Loads the OS image to RAM
  • Jumps to OS start address in RAM and calls startup fuction
  • The OAL takes over
Windows CE 7 includes a configurable and reusable bootloader named CE Boot with the following features:
  • Can load files from disks (IDE, PCI)
  • Emulates a console to allow user interraction at boot
  • Network support: DHCP, TFTP, IP


XLDR

In some cases, the system can be loaded in two steps : a first bootloader loads a second bootloader to RAM. The second bootloader loads the system image to RAM et jumps to it. This is necessary when:
  • The initial startup program is too small
  • The startup program on the target system is general purpose
  • The CPU has a small amount of RAM to load an image immediately and shall initialize an external RAM to host the system
XLDR is a lightweight loader that can load CE Boot in two stages.


OAL

The OAL allows the kernel to access the hardware layer (interrupts, timers, cache, IOCTL...) through an abstract interface.
When it takes over the boot phase, it accomplishes the following steps:
  • Initialize the CPU state, hardware and kernel's global variables
  • Jumps to the entry point of the kernel
  • The kernel exchanges global pointers with the OAL. From this point on, the kernel has access to all functions and variables defined in OEMGLOBAL and OAL has access to all functions and variables defined in NKGLOBAL
  • On kernel call, the OAL initializes the debug serial port (OEMInitSerialDebug) (like the bootloader did before without the help of the OAL)
  • On kernel call, the OAL initializes the rest of hardware interfaces on the device (OEMInit())
  • [Optional] On kernel call, KITL initialization (OEMKitlInit)
  • The kernel starts executing its first thread


Configuration files

File Description
config.bib Memory structure definition file
platform.bib BSP global settings. Selects which files need to included in the image depending on user-selected options/items
platform.dat Not used
platform.db Not used
platform.reg BSP global registry settings. Selects which keys to write in the registry depending on user-selected options/items
sources.cmn Starting point of the BSP build process. On top of source tree. Defines include directories and linked libraries
<MyBSP>.bat Project-specific environment variables to use in the build process. In particular, specifies the devices to include in the build.

To have a deeper look at the BSP's file structure, check the Build process.

Friday, April 7, 2017

WCE : Build process

Build process


BSP top Folder

BSP Folder Description
CATALOG BSP's catalog file (.pbcxml)
CESYSGEN BSP's makefile
FILES Files to be copied to the final image (nk.bin). Here are the main BSP configuration files. See What is a BSP ?
SRC Files needed to build the BSP

BSP SRC Folder

BSP Folder Description
INC BSP global header files
BOOT Bootloader's build directory
BOOTLOADER Networked bootloader's build directory
COMMON Code that is common to all components of the BSP
DRIVERS Target board's specific drivers
KITL KITL build directory
OAL OAL build directory

Build sequence

The build consists of 4 phases.
Phase Type Description
1 Compile phase Source and resource files are compiled into binaries. You should never need to recompile Windows CE sources.
2 Sysgen phase According to catalog items and dependenciy trees, SYSGEN variables are set. These variables act then as filters in header files to build a specific BSP.
3 Release copy phase The OS run-time files are copied to release directory.
4 Make run time image phase project.bib and project.reg are copied to release directory and according to their settings, the final run-time image is generated. Configuration files are merged: for instance, registry configuration file are merged into reginit.ini before being compiled in the final registry file.
The following diagram gives an overview of the build tools and how they interact with each other.


Behind the scene, Platform Builder relies on a set of batch scripts to compile the code. Build action calls buildemo.bat which in turn calls cebuild.bat, buildrel.bat and finally makeimage.exe.

WCE7 : Clone existing BSP

Platform Builder offers a wizard to clone an existing BSP. By doing so, we ensure that the original BSP won't be modified and we can tweak the new one for our needs. The menu is accessible from VS2008->Tools->Platform Builder->Clone BSP:

Note: If your source BSP is not in the list, ensure that a folder with its name is located in C:\WINCE700\platform.
Fill the rest of the information and click OK.


On the next window, the catalog items of your BSP will appear. You will be free to Add or Remove items:


Each item is linked to configuration variables that will be used to configure the build of the operating system. If you open the properties of any item, you should see variables like SYSGEN_xxx or BSP_xxx.

Windows CE 7 Architecture

Windows CE5 was based on a microkernel architecture.


In this type of architecture, the device drivers run in user mode which means that I/O handling routines are embedded into user-mode applications. It also means that the synchronization between the processes that share driver access needs to be done at application level, which is tricky.
NK.exe is the most privileged process of the operating system. It can access kernel memory addresses and make kernel calls.
Since Windows CE6, the architecture moved to a monolithic kernel architecture.


With this architecture, drivers and services have been moved to kernel space as dlls. NK.exe is still the most privileged process but this new architecture, by breaking the inter-process communication lines, enhances performances globally.
Component Description
GWES.dll Graphic, Windowing and Events Subsystem. It loads device drivers and manages their interface while loaded.
DEVMGR.dll Device Manager. It loads stream interface device drivers and manages their interface while loaded.
I/O Resource Manager Part of Device Manager that enumerates the available resources from registry
FILESYS.dll & FSDMGR.dll File system manager and file system driver manager.
Networking Dlls Network functionality (HTTP, TCP/IP, FTP...)
UDEVICE.exe User mode process that runs device drivers in user-mode
OAL OEM Abstraction Layer. Gives to the kernel an access to OEM hardware and maps interrupts with logical IDs
COREDLL.dll OS API (semaphore, thread, mutex, critical section...)
K.COREDLL.dll Kernel version of CoreDll (kernel device drivers links against this one)

Device driver: User mode vs Kernel mode

From performance point of view, it is better to embbed a driver in kernel space.
From security point of view, a bug in the driver might jeopardize the whole system.
For robustness, udevice.exe provides installable device driver feature, thus protecting the kernel.

Interrupt management


Component
Description
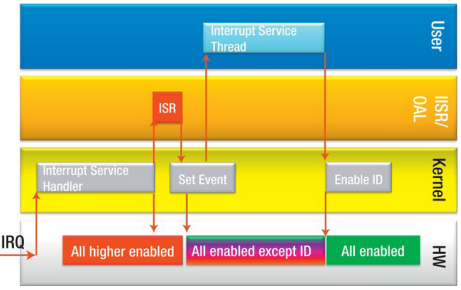
Kernel Interrupt Service Handler Can handle up to 64 separate hardware IRQS sources. It determines interrupt priority level and calls an ISR hooked to it and then sets event that is associated with interrupt ID (SYSINTR ID)
Interrupt Service Routines (ISRs) Hooked to IRQ in kernel mode. Acknowledges hardware and determines interrupt ID
Interrupt Service Threads (ISTs) Device-specific servicing for the specified Interrupt ID. Must signal completion of processing to hardware.
1. A device raises a registered interrupt.
2. The kernel catches the interrupt and calls the related Interrupt Service Routine (ISR).
3. ISR handles the interrupt and exits as quick as possible.
4. IST in driver is signaled to process the interrupt.
5. IST completes processing.

WCE7 detailed boot procedure

Here is a detailed description of how, theoretically, Windows CE boots on a device..

BUILD-TIME:

1. ROMIMAGE fixes up binaries in the OS image
An EXE or a DLL can be fixed up, which means that they are modified to adjust the variables and functions addresses depending on the binary location in virtual memory. At build time, the compiler doesn't know where the binaries will be located, so all of the pre-built addresses are wrong and need to be updated at load time. This is exactly what ROMIMAGE does when inserting the binaries in the final image that reflects the device's memory. To achieve this, ROMIMAGE relies on config.bib.
Note: All EXE and DLL files have a reserved section to be fixed up.
Note 2: All EXE and DLL files have an entry point that can be read in binary.

The image will contain 2 major binaries that will be required to boot:

Binary Description
NK.exe Contains all the functionality that is platform and architecture specific (typically, the OAL)
kernel.dll Contains architecture-neutral functionalities 

2. ROMIMAGE places tge TOC in the image file and fills pTOC variable with the location address
TOC stands for "Table Of Content". When all binaries have been placed in the image by ROMIMAGE, the start address of every binary is listed into a TOC structure. The TOC is then placed in the image as well.
The TOC will be needed at runtime and is accessible in the OAL with a pointer named pTOC. The value of this pointer is -1 at build time because the location of the TOC is unkown at this moment. The value is updated by ROMIMAGE once the TOC has been placed in the image.

Using the TOC, the program can find all other pieces of the operating system image.

BOOT TIME:

3. Bootloader puts the image at the right place in memory
4. Bootloader looks for the TOC in the image
Bootloader does not have access to pTOC variable (it is not part of NK.exe). Instead, it will use a trick done by ROMIMAGE.
When the TOC is placed in the image, it is prepended with a marker : "CECE" (or 0x44424442). The bootloader will find this marker and read the TOC.
5. Bootloader looks for NK.exe in TOC
6. Bootloader jumps to the entry point of NK.exe
7. NK.exe calculates the physical address of OEMAddressTable
At this moment of boot, the memory can only be addressed physically.
OEMAddressTable is a symbol in NK.exe, which means that it has a virtual memory fixed by ROMIMAGE. NK.exe knows its own physical location in memory and its future location in virtual memory.
OEMAddressTable physical address = (Physical address of NK.exe) + ( (OEMAddressTable virtual address) - (Virtual base address of NK.exe) )
8. NK.exe sets up the virtual memory mapping for the MMU
Virtual memory is now enabled and NK.exe moves to virtual memory.
However, RAM has not been initialized yet which means that all read/write variables can have any content whatsoever.
9. NK.exe copies the "copy entries" to RAM (R/W portions or RAM)
The function that does this is KernelReloacte().
The TOC describes also the RAM and where the read/write portions of each module are to be located. Pieces of OS image that need to be copied to RAM are called "copy entries".
Note: Obviously, pTOC is not located in RAM otherwise none of this would work. It is in ROM (const variable).
10. NK.exe sets up the Kernel Data Page and its initial content
Windows CE reserves a few regions of virtual address range for its own private use inside the OS kernel. There are several 4k pages of virtual memory from 0xFFFE0000 upwards. At least one page is reserved to Kernel Data Page.
NK.exe sets up the location and inserts:
  • A copy of TOC
  • The address of OEMAddressTable
  • The address of the function OEMInitGlobals()
11. NK.exe jumps to kernel.dll entry point with the address of the kernel data page as parameter
12. kernel.dll calls OEMInitGlobals() with the address of NKGlobals as parameter and gets the dadress of OEMGlobals as a return value

Variable Description
NKGlobals Static table of functions (ex: SetLastError(), NKwvsprintfW() ) and data in kernel.dll
OEMGlobals Static table of functions pointers and data : PFN_InitDebugSerial(), PFN_Ioctl(),... The functions pointers points to legacy OEM_xxx() functions (like OEMInitDebugSerial())

Once the call to OEMInitGlobals() completes, the kernel.dll has everuthing it needs to architecture-generic and platform-specific processing. It knows how memory is laid out virtually and where are all modules in the image.
NK.exe has also access to a set of kernel functions that it can call.
13. kernel.dll runs architecture-specific setup (ARMSetup() or X86Setup())
During this step, Interlocked API will be copied to Kernel Data Page. This is a critical part of the system that manages the coordination between threads.
14. kernel.dll runs architecture-neutral setup
Initialization of kernel debug output, selection of kernel processor type, check of the presence of KITL.dll.
Note: KITL is the system debugger.
Note 2: KITL can be loaded as a dll or directly included in the OAL. If the dll exists, it is loaded here.
15. kernel.dll runs platform-specific setup (OEMInit())
Platform specific initialization. KITL is started (if included in the image).
16. kernel.dll runs its first thread (SystemStartupFunc())
17. SystemStartupFunc() initializes the system
System loader, paging pool, system logging, system debugger, message queue, watchdog.
Creates a thread for Power Management.
Creates a thread for File System.
18. SystemStartupFunc() creates another thead which calls RunAppAtStartup()
This new thread creates first user processes.

WCE7 : Types of drivers

The Windows CE device drivers model takes into consideration 3 types of drivers:

Type of driver Description
Native drivers Built-in device drivers. They implement a feature-specific interface (Device Drivers Interface, DDI). They are loaded by GWES. Typical built-in drivers are:
- Display driver
- Touchscreen driver
- Keyboard driver
- Mouse driver
- LEDs drivers
Stream drivers Installable drivers. They implement a standard IO interface used for all types of IO devices (Init, DeInit, Open, Close, Read, Write...). They are configured in the registry and mounted by a device manager. They are very easy to add. Typical stream drivers are:
- Serial drivers
- Bus drivers
- Block drivers (for storage devices)
- Specific stream drivers
Hybrid drivers Stream drivers that implement an additional specific interface to their dedicated feature. Mounted by device manager but used by other processes through their specific interfaces. Example of hybrid drivers:
- Audio drivers
- PCMCIA controller drivers
- USB drivers

Types of architecture

Type of architecture Description
Layered Split into 2 layers : Model Device Driver (MDD) and Platform dependent device (PDD). The MDD implements the functional behaviors of the device that are independent of the device that is managed by the driver. Usually, this layer does not need to be modified.
The PDD implements treatments that are specific to the device being managed.
Windows CE device driver model defines the interface of PDD allowing the development of a PDD without caring about what MDD does. The interface of PDD is standardized but specific for each type of driver (Device Driver Service provider Interface, DDSI)
Monolithic Merge of MDD and PDD into one layer. Poor reusability. This type of drivers are mainly used for simple driver, without functional layer.


WCE7 : Customize your BSP

We suppose here that all the components required for your OSDesign are already in the catalog of your source platform. This is basically the case when you clone an existing BSP.
To customize your BSP, you will have to check the features you want to include in your OS image. Additionally, you can add registry settings, files or even add a new device driver if required (this is not explained here). This page gives an overview of a BSP customization for the BeagleBone Black platform.


Select your features


BSP features

Open Catalog Items View and unfold Third Party->BSP-><your BSP name>.
You have here all platform-specific components that you can reuse on your target platform.
Here is a picture of a possible selection for the BBB:


Core OS

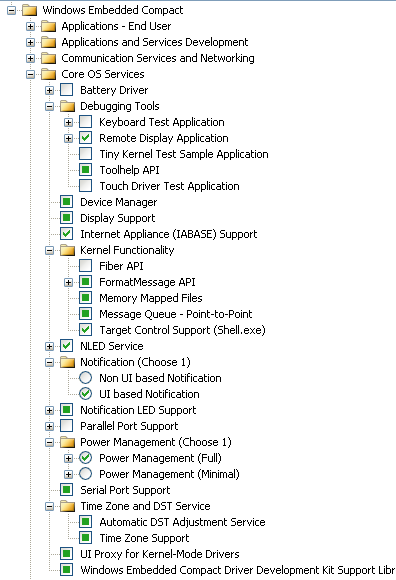
Open Catalog Items View and unfold CoreOS->Windows Embedded Compact.
The core OS features are platform-independent which means that they can be used on any target platform. Some of these options are related to the BSP features (via SYSGEN_xxx variables) and that's why some checkboxes are already checked (with a green square usually).
Below is an overview of the checked features for the BBB. We excluded IE7 support, media players, audio decoders, battery support... :


Add files to your BSP

If you want to add some files to your BSP, they need to be placed in C:\WINCE700\platorm\<your bsp>\Files.
All files located in this directory will be copied to the build release directory during build process.
To manage the files you want to copy to your output directory, you need to edit OSDesign.bib (you can also do this from C:\WINCE700\platorm\<your bsp>\Files\PLATFORM.BIB but it would applied to all OSDesigns).
For instance, if you want to add CoreCon files, you should append the following lines under FILES section:
eDbgTL.dll            $(_FLATRELEASEDIR)\eDbgTL.dll                    NK    S
TcpConnectionA.dll    $(_FLATRELEASEDIR)\TcpConnectionA.dll            NK    S

Reminder: All of these files need to be located in C:\WINCE700\platorm\<your bsp>\Files.
Setting Description
NK NK memory block specified in config.bib file (output NK.bin image)
S System file (will be located as system file in \Windows directory)
H Hidden file
K Kernel file
(for example, use SHK for a hidden system file located in kernel space).


What if I put these lines under MODULE section ?

The files put in MODULES will be processed by romimage so that the executable can be executed in eXecute In Place (XIP) from the ROM image. If you are not interested in that, put files in FILES section.

KITL and serial Debug

As explained here
When launching an OS image from the target device’s local storage, built with the above debugging helper components enabled, the OS image may not be able to function as intended and may not be able to complete the boot process, such as:
  • When an OS image is generated with KITL component enabled, it attempts to establish connection with an unavailable KITL connection, which causes the OS not able to complete the boot process.
  • When an OS image is generated with the serial debug component enabled, the serial debug component capture one of the available serial port, making the port unavailable to the device’s application.
So go through the following steps before building the image:
  • Open your project properties and disable KITL. Clik OK to apply

Additional registry settings


FTPD settings

Add these lines to your OSDesign.reg file to allow unauthenticated connections with anonymous credentials.
Set the default directory to root dir to give an access to all files remotely.
[HKEY_LOCAL_MACHINE\COMM\FTPD]
    "IsEnabled"=dword:1
    "UseAuthentication"=dword:0
    "UserList"="@*;" 
    "AllowAnonymous"=dword:1
    "AllowAnonymousUpload"=dword:1
    "AllowAnonymousVroots"=dword:1
    "DefaultDir"="\\" 

.NET CF runtime error bypass

The following error can happen at the execution of a .NET application after boot
.NET CF Initialization Error, The application failed to load required components. If the .NET Compact Framework is installed on a storage card... Support info:
-2147438590 (8000B002)
However, if we deploy an application from a PC to the remote device and start an app again it will work. This strange beahavior is due to a registry setting that is updated when we deploy an application.
To avoid this issue, edit OSDesign.reg and add the following lines
[HKEY_LOCAL_MACHINE\SOFTWARE\Microsoft\.NetCompactFramework\Managed Debugger]
    "AttachEnabled"=dword:0
And add the following files to your OSDesign (in C:\WINCE700\platform\<your BSP>\FILES):
%COMMONPROGRAMFILES%\Microsoft shared\CoreCon\1.0\Target\wce400\armv4i\eDbgTL.dll
%COMMONPROGRAMFILES%\Microsoft shared\CoreCon\1.0\Target\wce400\armv4i\TcpConnectionA.dll

WCE7 : How to write a device driver


Quick introduction

An application interacts with a device driver thanks to file system functions (CreateFile, ReadFile, WriteFile,...).
To identify the driver to be opened, the application needs to specify a file name to CreateFile:

* [Usual format] "XXXy:" : with X a capital letter and y a number in [1;9] (0 is authorize to indicate the 10th index)
* [Device mount point] "\\<device_mount_point>\\XXXy:"
* [Bus mount point] "\\<bus_mount_point>\\XXXy:"
The three capital letters form a prefix that will identify the driver. The number indicates the index of the driver if several can be instanciated.
This prefix is also used by Windows to load the device driver methods. In fact, the prefix shall precede the device driver methods in driver dll:
* XXX_CreateFile
* XXX_ReadFile
* ...

All device drivers are listed in registry below HKLM\Drivers\BuiltIn with at least the following subkeys:

Key Description
Prefix Explained above (e.g. "XXX")
Dll Driver dll method to be loaded

At system boot, Device Manager will iterate over these entries and load them. For every loaded driver, an entry will be created in HKLM\Drivers\Active.
The order of load can be specified if the driver entry specifies a key Order followed by a number that indicates when it shall be loaded (with 1 the first to be loaded)
Other optional subkeys can be used for a driver, but they won't be described here.
In the following chapters, we will create the necessary files to add a driver to our BSP. In the scope of this tutorial, we will create a driver for the DS1307 RTC chip.


Add a new catalog entry

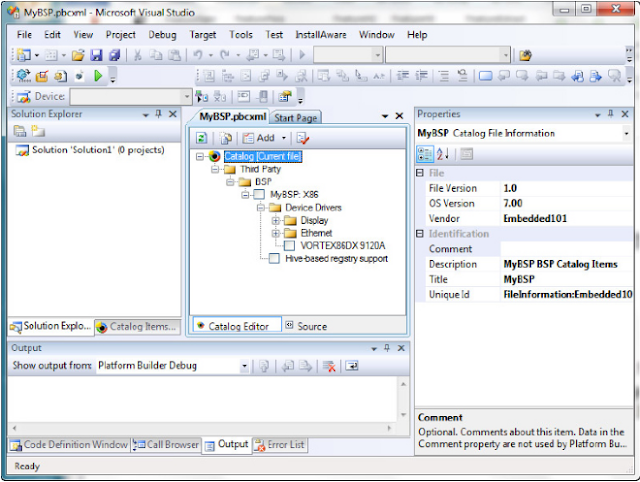
The first step is to add a catalog entry to our BSP. To do so, either open the *.pbcxml file with Visual Studio and use the graphical interface or edit the *.pbcxml file and add the following lines:
<Bsp>
    ...
    <BspItemId>FT5X06_TOUCH:LNI Swissgass:FT5X06_LniBSP</BspItemId>
    <BspItemId>RTC_DS1307:LNI Swissgass:RTC_DS1307_LniBSP</BspItemId>
    <BspItemId>DVI_Type:LNI Swissgas:DVI_Type_LniBSP</BspItemId>
    ...
</Bsp>
<Item Id="RTC_DS1307:LNI Swissgass:RTC_DS1307_LniBSP">
    <Title>RTC driver</Title>
    <Description>Real Time Clock</Description>
    <Comment>Only valid for DS1307 chip</Comment>
    <Type>BspSpecific</Type>
    <Variable>BSP_RTC_DS1307</Variable>
    <Module>rtc_ds1307.dll</Module>
    <Location ConditionLocation="">Drivers\RTC</Location>
</Item>
These lines add a new driver to the catalog under Driver\RTC. If checked, this driver defines the variable BSP_RTC_DS1307.


Hands on code : create the driver component

Create a directory for our driver under <MyBSP>\SRC\Drivers : here we create a folder named RTC. The following steps are to be done in this directory.
The most obvious file to add to our componen is makefile. This file is always the same for all drivers so copy/paste an existing one or create it and add the following lines:
!if 0
Copyright (c) Microsoft Corporation.  All rights reserved.
!endif
!if 0
Use of this source code is subject to the terms of the Microsoft end-user
license agreement (EULA) under which you licensed this SOFTWARE PRODUCT.
If you did not accept the terms of the EULA, you are not authorized to use
this source code. For a copy of the EULA, please see the LICENSE.RTF on your
install media.
!endif
#
# DO NOT EDIT THIS FILE!!!  Edit .\sources. if you want to add a new source
# file to this component.  This file merely indirects to the real make file
# that is shared by all the components of Windows CE.
#
!INCLUDE $(_MAKEENVROOT)\makefile.def
Our driver needs to be declared in registry. Create an rtc_ds1307.reg file and the following lines:
IF BSP_RTC_DS1307
[HKEY_LOCAL_MACHINE\Drivers\BuiltIn\RTC_DS1307]
    "Prefix"="RTC" 
    "Dll"="rtc_ds1307.dll" 
    "Index"=dword:1
    "order"=dword:101                ; Should be loaded after I2C
ENDIF BSP_RTC_DS1307
The file structure of a WEC7 BSP requires a file named sources in every folder that contains files to take into consideration during build. Create one with the following lines:
!if 0
;================================================================================
; RTC Driver DS1307
;================================================================================
!endif

!IF "$(BSP_RTC_DS1307)" == "" 
SKIPBUILD=1
!ENDIF

TARGETNAME=rtc_ds1307
TARGETTYPE=DYNLINK

TARGETLIBS= \
    $(_PLATLIB)\$(_CPUDEPPATH)\ceddk.lib \
    $(_COMMONSDKROOT)\lib\$(_CPUINDPATH)\coredll.lib

SOURCES= \
    rtc_ds1307.c \
Our driver will obviously need to export the stream interface driver methods. This is done with a *.def file as follows:
LIBRARY     RTC_DS1307

EXPORTS RTC_Init
    RTC_Deinit
    RTC_Open
    RTC_Close
    RTC_Read
    RTC_Write
    RTC_IOControl
And now, we can add some code :
//
//  File: rtc_ds1307.c
//
//  This file implements device driver for RTC DS1307. 
//
#include "omap.h" 
#include "ceddkex.h" 
#include "sdk_padcfg.h" 
#include "bsp_padcfg.h" 
#include "bsp.h" 

#include <nkintr.h>
#include <winuserm.h>
#include <pmpolicy.h>

// ==== Debug Zones ================================================================================
// simple handling: debug zones are forced with TRUE or FALSE and need a recompile to be activated
// for sophisticated handling: use macro DEBUGZONE(), DBGPARAM dpCurSettings etc.
// (see MSDN e.g. Win CE 5.0, Debug Zones)
#ifndef SHIP_BUILD

#undef ZONE_ERROR
#undef ZONE_WARN
#undef ZONE_FUNCTION
#undef ZONE_INFO
#undef ZONE_TIPSTATE

#define ZONE_ERROR          DEBUGZONE(0)
#define ZONE_WARN           DEBUGZONE(1)
#define ZONE_FUNCTION       DEBUGZONE(2)
#define ZONE_INFO           DEBUGZONE(3)
#define ZONE_TIPSTATE       DEBUGZONE(4)

static DBGPARAM dpCurSettings = {
    L"RTC_DS1307", {
        L"Errors",      L"Warnings",    L"Function",    L"Info",
            L"IST",         L"Undefined",   L"Undefined",   L"Undefined",
            L"Undefined",   L"Undefined",   L"Undefined",   L"Undefined",
            L"Undefined",   L"Undefined",   L"Undefined",   L"Undefined" 
    },
    // Bitfield controlling the zones.  1 means the zone is enabled, 0 disabled
    // We'll enable the Error, Warning, and Info zones by default here
    1 | 1 << 1 | 1 << 2 | 1 << 3
};

#endif

//------------------------------------------------------------------------------
DWORD RTC_Init(LPCTSTR szContext, LPCVOID pBusContext)
//  Called by device manager to initialize device.
{
    int i;
    DWORD rc = (DWORD)NULL;

    UNREFERENCED_PARAMETER(pBusContext);

    DEBUGMSG(ZONE_FUNCTION, (L"+RTC_Init(%s, 0x%08x)\r\n", szContext, pBusContext));
    RETAILMSG(1, (L"+RTC_Init\r\n"));

cleanUp:
    DEBUGMSG(ZONE_FUNCTION, (L"-RTC_Init(rc = %d\r\n", rc));

    return rc;
}

//------------------------------------------------------------------------------
BOOL RTC_Deinit(DWORD context)
{
    BOOL rc = FALSE;

    DEBUGMSG(ZONE_FUNCTION, (L"+RTC_Deinit(0x%08x)\r\n", context));

    rc = TRUE;

cleanUp:
    DEBUGMSG(ZONE_FUNCTION, (L"-RTC_Deinit(rc = %d)\r\n", rc));
    return rc;
}

//------------------------------------------------------------------------------
DWORD RTC_Open(DWORD context, DWORD accessCode, DWORD shareMode)
{
    UNREFERENCED_PARAMETER(context);
    UNREFERENCED_PARAMETER(accessCode);
    UNREFERENCED_PARAMETER(shareMode);
    return context;
}

//------------------------------------------------------------------------------
BOOL RTC_Close(DWORD context)
{
    UNREFERENCED_PARAMETER(context);
    return TRUE;
}

//------------------------------------------------------------------------------
DWORD RTC_Read(DWORD context, LPVOID pBuffer, DWORD Count)
{
    UNREFERENCED_PARAMETER(context);
    UNREFERENCED_PARAMETER(pBuffer);
    UNREFERENCED_PARAMETER(Count);
    return 0;
}

//------------------------------------------------------------------------------
DWORD RTC_Write(DWORD context, LPCVOID pSourceBytes, DWORD NumberOfBytes)
{
    UNREFERENCED_PARAMETER(context);
    UNREFERENCED_PARAMETER(pSourceBytes);
    UNREFERENCED_PARAMETER(NumberOfBytes);
    return 0;
}

//------------------------------------------------------------------------------
BOOL RTC_IOControl(
    DWORD context, DWORD code, BYTE *pInBuffer, DWORD inSize, BYTE *pOutBuffer,
    DWORD outSize, DWORD *pOutSize
) {
    UNREFERENCED_PARAMETER(context);
    UNREFERENCED_PARAMETER(code);
    UNREFERENCED_PARAMETER(pInBuffer);
    UNREFERENCED_PARAMETER(inSize);
    UNREFERENCED_PARAMETER(pOutBuffer);
    UNREFERENCED_PARAMETER(outSize);
    UNREFERENCED_PARAMETER(pOutSize);
    DEBUGMSG(ZONE_INIT, (L"RTC_IOControl"));
    return FALSE;
}

//------------------------------------------------------------------------------
BOOL __stdcall DllMain(HANDLE hDLL, DWORD reason, VOID *pReserved)
{
    UNREFERENCED_PARAMETER(pReserved);
    switch (reason) {
    case DLL_PROCESS_ATTACH:
        DEBUGREGISTER(hDLL);
        DisableThreadLibraryCalls((HMODULE)hDLL);
        break;
    }
    return TRUE;
}
and a header (optional):
#ifndef __RTC_DS1307_H
#define __RTC_DS1307_H

// Stream interface entry points

// Initialization of controlled hardware, setup of ISR and IST(if any),
// setup of memory access (if any) 
DWORD RTC_Init(LPCTSTR szContext, LPCVOID pBusContext);
// Cleans up what Init did
BOOL RTC_Deinit(DWORD context);
// Implicitely called by CreateFile
// Opens the context for client usage
DWORD RTC_Open(DWORD context, DWORD accessCode, DWORD shareMode);
// Closes the context opened in Open
BOOL RTC_Close(DWORD context);
// Use if required : read data out of driver
DWORD RTC_Read(DWORD context, LPVOID pBuffer, DWORD Count);
// Use if required : write data to driver
DWORD RTC_Write(DWORD context, LPCVOID pSourceBytes, DWORD NumberOfBytes);
// Driver specific functionality
BOOL RTC_IOControl(
    DWORD context, DWORD code, BYTE *pInBuffer, DWORD inSize, BYTE *pOutBuffer,
    DWORD outSize, DWORD *pOutSize
);

#endif // __RTC_DS1307_H

Add driver to project build

The driver component is ready, we need to include it to the project. As said earlier, the file structure of a BSP requires sources files to include files to build but also dirs files to list the directories that will be visited during build. Open <MyBSP>\SRC\Drivers\dirs and add an entry for our new driver.
DIRS=\
        ...
    FT5X06\
    RTC_DS1307\
    WAVEDEV2\
        ...
For rom image creation, we need now to tell the project that it should put the driver's dll into the image.
Open platform.bib and add the following lines:
...
IF BSP_RTC_DS1307
rtc_ds1307.dll    $(_FLATRELEASEDIR)\rtc_ds1307.dll            NK  SHK
ENDIF
...
Finally, add the following lines to platform.reg to integrate the component's registry settings:
...
;===============================================================================
; RTC DS1307 driver
#include "$(PLAT_DRIVERS_DIR)\RTC_DS1307\rtc_ds1307.reg" 
...
You're good to start the development of the driver.

WCE7 : Develop a touchscreen driver

The Compact 7 touch driver architecture includes a touch driver and a touch proxy driver (WinCE 6 legacy interface).


Component Description
Touch driver Stream interface driver implemented as a layered driver. MDD exports standard stream interface functions (Init, PreDeInit, PreClose, Close, PowerDown, PowerUp, Read and IOContol). Since this is a stream interface driver, it is loaded by Device Manager.
Touch proxy driver Provides the WinCE 6 touch API. GWES loads this driver instead of touch driver.
Touch calibration DLL Not compiled in the driver. Separate DLL provided by Compact 7
The picture above, shows:
  • The initialization mechanism with blue arrows
  • The touch event management with red arrows

Where to start ?

Most of the components introduced in the first part are already included in Compact 7:
  • Touch driver proxy : _WINCEROOT\Public\Common\Oak\Drivers\touch
  • Touch driver MDD : _WINCEROOT\public\common\oak\drivers\touch\tchstreammdd
  • Calibration DLL : _WINCEROOT\public\common\oak\drivers\touch\tchcaldll
The only part that needs to be developed is the touch driver PDD which is the platform-dependent module (MDD is the platform independent module).
The interface of PDD is defined by the DDSI (Device Driver Stream Interface) and includes the following methods:

Function Description
TchPdd_Init Returns the pointers to the DDSI interface and initialize hardware
TchPdd_DeInit Clean up (hardware deinit, memory release...)
TchPdd_PowerUp Called by MDD (implicitely by power manager) at power-up
TchPdd_PowerUp Called by MDD (implicitely by power manager) at power-down
TchPdd_Ioctl Specific-features offered to the MDD

Enable touch screen mechanism

To enable the Compact 7's internal touchscreen, the following variables need to be defined in the OS Design from catalog item view.

Variable Description
SYSGEN_TOUCH If defined, the touch cursor will be set

WCE7 : How to debug the BSP

Debugging is a key part in driver development. It helps to step into the code at runtime and analyze the memory stacks.


How to enable debugging ?

Debugging is handled by KITL (Kernel Independent Transport Layer) in Windows Embedded Compact. KITL makes the connection between host and target device and transports debugging information.
To enable it, here are the main steps:
  • Select the DEBUG configuration in your BSP project
  • Open project properties from Solution Explorer. From the left pane, expand Configuration Properties node and select Build Options.
  • Enable KITL and Enable Profiling.
  • Ensure that ship build is not checked.
  • Disable "CPGMAC Ethernet" driver from catalog (incompatible with Kitl)
  • Save and rebuild the image.
Once built, copy the new NK.bin and EBOOTSD.nb0 to the target's SD card (or wherever you boot from) and boot.
At startup, hit space to enter EBOOT menu when asked to (from the serial debug line UART0):
BOOTLOADER: b# total sectors:1DD77C1
BOOTLOADER: b# sec/fat:      3B9F
BOOTLOADER: b# hidden sec:   1
BOOTLOADER: FileIoInit() initializing data structures.
BOOTLOADER: FileIoReadNextSectors EOF
BLReadBootCfg returns error
WARN: Boot config wasn't found, using defaults
INFO:LCD display configured
INFO:LCD resolution 800x480
INFO:Boot setting: 0x18
INFO:Boot setting: Using SDCard
INFO:PRM_RSTST: 0x00000020
7255c288 d6a2 -> 88 c2 55 72 a2 d6
7255c288 d8a2 -> 88 c2 55 72 a2 d8
Hit space to enter configuration menu [468] 5...
Hit space to enter configuration menu [1468] 4...
Hit space to enter configuration menu [2468] 3...

--------------------------------------------------------------------------------
 Main Menu
--------------------------------------------------------------------------------
 [1] Show Current Settings
 [2] Select Boot Device
 [3] Select KITL (Debug) Device
 [4] Network Settings
 [5] SDCard Settings
 [6] Set Device ID
 [7] Save Settings
 [9] Enable/Disable OAL Retail Messages
 [a] Select Display Resolution
 [b] Select OPP Mode
 [c] Enable clean registry boot
 [0] Exit and Continue

 Selection:
Select menu number 2 and then select "Internal EMAC". Finally select 0 to exit and continue:
--------------------------------------------------------------------------------
 Main Menu
--------------------------------------------------------------------------------
 [1] Show Current Settings
 [2] Select Boot Device
 [3] Select KITL (Debug) Device
 [4] Network Settings
 [5] SDCard Settings
 [6] Set Device ID
 [7] Save Settings
 [9] Enable/Disable OAL Retail Messages
 [a] Select Display Resolution
 [b] Select OPP Mode
 [c] Enable clean registry boot
 [0] Exit and Continue

 Selection: 2

--------------------------------------------------------------------------------
 Select Boot Device
--------------------------------------------------------------------------------
 [1] Internal EMAC
 [2] NK from SDCard FILE
 [3] NK from eMMC FILE
 [0] Exit and Continue

 Selection (actual NK from SDCard FILE ): 1
 Boot device set to Internal EMAC

--------------------------------------------------------------------------------
 Main Menu
--------------------------------------------------------------------------------
 [1] Show Current Settings
 [2] Select Boot Device
 [3] Select KITL (Debug) Device
 [4] Network Settings
 [5] SDCard Settings
 [6] Set Device ID
 [7] Save Settings
 [9] Enable/Disable OAL Retail Messages
 [a] Select Display Resolution
 [b] Select OPP Mode
 [c] Enable clean registry boot
 [0] Exit and Continue

 Selection: 0

You should see the boot process going on and end with several BOOTME message broadcasts:
+Cpsw3gInit(0x4a100000, 0x00000001, 0x8feffedc) v0.3
g_cpsw3g_reg_base = 0xb0500000
Phy_init: Auto negotitation completed
Cpsw3gInit, wait link up on mac port:1.
link up on port 1, speed 100, full duplex
-Cpsw3gInit
INFO: Boot device uses MAC 88:c2:55:72:a2:d6
INFO: *** Device Name LNI33X-41686 ***
InitDHCP():: Calling ProcessDHCP()
ProcessDHCP()::DHCP_INIT
Got Response from DHCP server, IP address: 192.168.200.138

ProcessDHCP()::DHCP IP Address Resolved as 192.168.200.138, netmask: 255.255.255.0
Lease time: 3600 seconds
Got Response from DHCP server, IP address: 192.168.200.138
No ARP response in 2 seconds, assuming ownership of 192.168.200.138
+EbootSendBootmeAndWaitForTftp
Sent BOOTME to 255.255.255.255
!CheckUDP: Not UDP (proto = 0x6)
Sent BOOTME to 255.255.255.255
The target is now looking for a host to start debugging. From Visual Studio, use the "Attach device" button to detect remote targets:

A open shall show up and detect the remote device automatically.
[First time only] Double click on the target device in the popup window.

Visual Studio should now start to download the compiled binary on the target device. Once done, the debugging will start.

WCE7 : Stamp license key


From Visual Studio

After you building a Release version of NK.Bin, the license key can be "stamped" using Platform Builder :

Here are the steps:
  1. Make sure that you have selected a Release configuration of your OS design to build a run-time image from. (WINCESHIP option shall be set to 1 in project properties. It defines the compile time flag -DSHIP_BUILD)
  2. From the Build menu, verify that Make Run-Time Image After Build and Copy Files to Release Directory After Build are selected.
  3. From the Build menu, select Build and Sysgen to build your run-time image.
  4. From the Tools menu, select Platform Builder for CE 7.0, and then select License Run-Time Image to stamp your .bin file with the license key.
  5. In the License Run-Time Image dialog box, in the Run-time key field, enter the run-time key.
  6. Browse to the location of the run-time image file that you want to license, and then click License.

Automatic

Not tested
Create a text file license.txt with the following content :
<license key> 00000000 00000000 00000000 00000000 00000000
here is an example:
OKJB4-098HN-HFR8F-HBVC8-JF789 00000000 00000000 00000000 00000000 00000000
The trailing 5 DWORDs are OEM-specific.
Run the following command in the release directory:
stampbin -1 -i NK.bin license.txt
Verification:
viewbin -t nk.bin >binaryInfo.txt
Look for ROMHDR and check that PID [0-4] contains the license key:
ROMHDR Extensions -----------------------------
    PID[0] = 0x11111111
    PID[1] = 0x22222222
    PID[2] = 0x33333333
    PID[3] = 0x44444444
    PID[4] = 0x00000000
    PID[5] = 0x00000000
    PID[6] = 0x00000000
    PID[7] = 0x00000000
    PID[8] = 0x00000000
    PID[9] = 0x00000000

WCE7 : Connection loss with device on breakpoint

Connection with device lost on Breakpoint

After a successful deployment of the application to the remote device, the application starts (no breakpoint set so far).
However, if the user sets his first breakpoint in code, the debugging session immediately ends due to a "Connection lost" issue.
There is a fix from Microsoft to resolve this issue with WinCE7:

http://www.microsoft.com/en-us/download/details.aspx?id=11935

Install the package and it will resolve the problem.

TPS65217 : The power management chip on BBB

TPS65217 is mounted in its C revision on BeagleBlone Black rev C and BeagleCore. This chip is in charge of power up/ power down and handles the voltages needed by the board.
For this note, we will ignore the push button action on the chip as we are not using it.


Features

TPS65217 provides:
  • 3 step down converters (up to 1,2A output each)
  • 2 LDOs (+ 2 load switches configurable as LDOs): 1&2: 100mA, 3&4: 400 mA (rev C)
  • 1 linear battery charger
  • White LEDs driver
  • Power path
It can be configured through its i²C interface:
  • all rails, power swtches, LDOs can be enabled/disabled
  • power up/down sequences can be programmed (non-persistent, must be programmed from chip startup)
  • over temperature limits

Power up/down sequence

Power up

The default power up sequence can work with any type of application. It is defined by strobes and delay times. On each strobe (from 1 to 7) the rail that is attached to the strobe is powered up. After a delay (from 1 to 10 ms), the next strobe occurs and so on. Several rails can be attached to the same strobe but a rail can be attached to 1 strobe only.
The power up sequence occurs when any power source is ON (USB/AC adaptor) and PWR_EN pin is asserted.

Power down

It follows the reverse power up sequence but with STROBE7 occuring first and continuing down to STROBE1.
If the application requires all strobes to occur at the same time (no delay), INSTDWN bit in SEQ6 shall be asserted.
The power down sequence occurs when any of the following events occurs:
  • SEQDWN bit is set
  • PWR_EN is pulled low
  • nRESET is pulled low
  • A fault occurs in the IC

Strobe 14/15

The strobes are not handled by the sequencer. They are used to control rails that are always ON and shall be powered up as soon as the device exits OFF state. The strobe can only be assigned for LDO1 and LDO2 rails.
For power down, the strobes occurs only if the OFF bit is set which means that they are still active in SLEEP mode.


Power good

These signals are here to indicate if an output is in regulation or at fault. They are monitored at all time and if a fault occurs, all output rails are powered down and the device enters OFF state.

Power path

The power path allows simultaneous and independend charging of the battery and powering of the system. The battery can be charged from USB or AC.
The power path prioritizes the AC over USB and both over battery input to power up the system.


Device functional modes

Mode Description
OFF PMIC is completely shut down with the exception of AC/USB monitoring inputs. To enter OFF state, OFF bit in STATUS register shall be asserted and then, PWR_EN pin whall go low. OFF state can only be enetered from ACTIVE state
ACTIVE All power rails are operational, and i²C is active.
SLEEP Low power mode. All power rails are turned OFF with the exception of LDO1 (but with a current of 1mA). To enter SLEEP state, OFF bit in STATUS register shall be de-asserted (0) and then, PWR_EN pin whall go low.
RESET All power rails are shut down and registers are reset. Stays in this state for 1 sec before returning to ACTIVE.


Block diagram


Power signals assignments on BBB (non-exhaustive)

Output Mapping Function
L1_VDCDC1 VDDS_DDR SDRAM
L2_VDCDC2 VDD_MPU
L3_VDCDC3 VDD_CORE
LS1_OUT VDD_1V8 SDRAM / MPU / ADC / USB / HDMI
LS2_OUT VDD_3V3A eMMC / EEPROM / USB / HDMI / LCD / nRESET / (BCM1 : Power Led) / HDMI / I2C0 (pull-up)
VLDO1 VIO / VRTC / VDD_S nRESET / Ext. Wakeup
VLDO2 VDD_3V3AUX Power Led
SYS1 & SYS2 SYS_5V User Leds / HDMI / USB
Moreover, the signal VDD_3V3B is created from SYS_5V and VDD_3V3A (Enable). It is used for : JTAG / UART0 / µSD / LAN / HDMI CEC.

WCE7 : Disable the Input panel (SIP)

SIP=System Input Panel.
It is the official virtual keyboard that pops up in windows CE when we are in edition mode.


To disable it, the registry need to be edited. The following key needs to be changed:
[HKEY_CURRENT_USER\ControlPanel\SIP]
"TurnOffAutoDeploy"=dword:0
to
[HKEY_CURRENT_USER\ControlPanel\SIP]
"TurnOffAutoDeploy"=dword:1
When the modification has been saved, the input panel won't show up anymore.

Hard drive layout and boot requirements

How does software boot from hard drive ?
What are the requirements to boot any operating system from a hard drive ?
What means MBR, FAT, cluster, sector ... ?


MBR, the cornerstone

The Master Boot Record is a memory zone located at:
  • Logical address 0 (if the hard drive uses LBA)
  • Cylinder 0, Head 0, Sector 1 (if the hard drive uses CHS addressing. Used by old hard drives)
which contains the OS boot code (i.e. bootstrap) and a partition table.
This memory area has a size of 512 bytes.
mbr.gif
Basically, if anything happens to this memory zone, the hard drive is brain dead.
Usually, the machine will execute the bootstrap which is the 1st level bootloader that scans the partition table, finds the active partition and jumps to it where the 2nd level bootloader shall be located at address 0. Others, like embedded systems where the CPU has its own 1st level bootloader, will read directly the partition table and achieve the same task.
partitionentry.jpg
All partition have a beginning address, ending address, a size given in sectors.
By reading this table, a machine locates the active partition, and jumps to its starting address where another boot record is located. Basically, a boot record is present at the first sector of each partition.


Wait, a sector ? What is this ?

When speaking about hard drives, the same vocabulary is always used:
  • sector: amount of bytes (almost always 512 byte for compatibily purpose)
  • cluster: amount of sectors. This number depends on the disk format settings and can be read from boot record.
Note: When working with non-volatile memories like eMMC, another unit is sometimes uses : block. If the memory is formatted as a bootable hard drive, a block equals a sector.
The cluster is the unit used by file systems.


FAT

File Allocation table is one of the disk formats used by computers (old Windows mashines, boot disks for some linux machines, ...).
There are 3 types of FAT that are commonly used : FAT12, FAT16 and FAT32.
Here is an overview of the layout of a FAT disk:
fatlayout.jpg
One of the biggest difference between FAT32 and older FAT layouts is that the root directory section is now part of the data area.


OK about FAT layout, but where is the MBR ?

In the reserved area, the first sector of a FAT disk is ... the MBR !
Here are the settings that are registered in the boot code for a FAT12 disk:
Bytes Description
0-2 Jump to bootstrap Legacy bytes almost always equals to 0xeb 0x3C 0x90 where 0xEB is the jump instruction for x86 machine (sometimes 0xEA is used instead)
3-10 OEM Name / Version (string)
11-12 Number of bytes per sector (512,1024,2048,4096)
13 Number of sectors per cluster (1,2,4,8,16,32,64,128)
14-15 Number of reserved sectors (FAT32 -> 32, others -> 1)
16 Number of FAT copies
17-18 Number of root directory entries (0 for FAT32, 512 recommended for FAT16)
19-20 Total number of sectors in the filesystem (N/A for FAT32)
21 Media descriptor type (0xF0: Floppy disk, 0xF8: Hard disk)
22-23 Number of sectors per FAT (0 for FAT32)
24-25 Number of sectors per track
26-27 Number of heads (2 for a double sided floppy disk)
28-29 Number of hidden sectors
30-509 Bootstrap
510-511 Signature, always equal to 55h AAh (signature of the MBR)
Here are the FAT16 extensions:
Bytes Description
11-27 Identical
28-31 Number of hidden sectors
32-35 Total number of sectors in the filesystem (replaces byte 19-20 of FAT12)
36 Logical drive number
37 Reserved
38 Extended signature
39-42 Serial Number of partition
43-53 Volume label or no name (string)
54-61 File system type ("FAT32 ", "FAT16 ", "FAT ")
62-509 Bootstrap
510-511 Signature 55h AAh
Here are the FAT32 extensions:
Bytes Description
11-35 Identical
36-39 Sectors per FAT
40-41 Mirror flags (Bits 0-3: number of active FAT, Bits 4-6: reserved, Bit7; 1=single active FAT, 0=all FATs are updated at runtime)
42-43 Filesystem version
44-47 First cluster of root directory (usually 2). This is the important improvement of FAT32. Now the root directory area is not at a fixed place with a fixed size and grow.
48-49 Filesystem information sector (FSINFO) in reserved area (usually 1)
50-51 Backup boot sector location (can be 0)
52-63 Reserved
64 Logical drive number
65 Reserved
66 Extended signature
67-70 Serial number of partition
71-81 Volume label
82-89 Filesystem type ("FAT32 ")

The FAT area

A FAT is table with one entry per cluster. Each entry has a size of:
  • 12 bits for FAT12
  • 16 bits for FAT16
  • 32 bits for FAT32
Each entry specified if the cluster has data in it or if there is another cluster following it.
The first 2 entries of a FAT table are unused. The first one contains 0xFFFFFFF8 with 0xF8 the media descriptor while the other one contains the end of file marker (0xFFFFFFFF).
The FAT area is split in two :
FAT #1 FAT #2
where FAT #2 is a mirror of FAT #1.


FSINFO

File system information sector is located at logical sector 1 (in reserved area).
The purpose of this sector is not clear.
Offset Description Size
00h First Signature (52h 52h 61h41h) 1 Double Word
04h Unknown, Currently (Mightjust be Null) 480 Bytes
1E4h Signature of FSInfo Sector(72h 72h 41h 61h) 1 Double Word
1E8h Number of Free Clusters (Setto -1 if Unknown) 1 Double Word
1ECh Cluster Number of Clusterthat was Most Recently Allocated. 1 Double Word
1F0h Reserved 12 Bytes
1FCh Unknown or Null 2 Bytes
1FEh Boot Record Signature (55hAAh) 2 Bytes

Root directory

This area contains an entry for each file located at the root of the filesystem. Every entry has the following properties:
Offset Description Size
00h Filename 8 bytes
08h Filename extension 3 bytes
0Bh File attributes 1 byte
0Ch Reserved 10 bytes
16h Time created or last updated 2 bytes
18h Date created or last updated 2 bytes
1Ah Starting cluster for this file 2 bytes
1Ch File size in bytes 4 bytes
A subdirectory is a file with specific attributes (byte 0Bh).

WCE7 : Read CPU registers on BeagleBone

Sometimes, it may be useful to watch the CPUs registers to confirm that a peripheral is configured properly or to monitor a signal change from the CPU point of view.
Here are some hints to achieve that easily.

Monitor MPU registers

MPU is the central processing unit in charge of interrupt handling. To read its registers, use the following code:
#include "am33x_irq.h" 
#include <am33x_interrupt_struct.h>

// Interrupt context
static AM33X_INTR_CONTEXT  s_intr;
AM33X_INTR_CONTEXT const *g_pIntr = &s_intr;

void somefunction(void)
{
   UINT32                        irqSIR, irqINTC_ITR_3, irqPENDING_IRQ3;
   PHYSICAL_ADDRESS pa;

   // Get interrupt controller and GPIO registers' virtual uncached addresses
    pa.QuadPart = GetAddressByDevice(AM_DEVICE_MPU);
    s_intr.pICLRegs = (AM33X_INTC_MPU_REGS*)MmMapIoSpace(pa, sizeof(AM33X_INTC_MPU_REGS), FALSE);
    if (s_intr.pICLRegs == NULL)
    {
        DEBUGMSG(1, (L"ERROR: Am3xxGpioInit: Failed map MPU controller registers\r\n"));
    }

    irqSIR = INREG32(&g_pIntr->pICLRegs->INTC_SIR_IRQ);
    irqINTC_ITR_3 = INREG32(&g_pIntr->pICLRegs->INTC_ITR3);
    irqPENDING_IRQ3 = INREG32(&g_pIntr->pICLRegs->INTC_PENDING_IRQ3);

    // Activate IRQs for GPIO0A
    //OUTREG32(&g_pIntr->pICLRegs->INTC_ILR[96], 0U); // Route to IRQ and set max priority
    //OUTREG32(&g_pIntr->pICLRegs->INTC_MIR3, irqMIR3 | 0x1);
}


Monitor GPIO registers

#include "am33x_irq.h" 
#include <am33x_interrupt_struct.h>

// Interrupt context
static AM33X_INTR_CONTEXT  s_intr;
AM33X_INTR_CONTEXT const *g_pIntr = &s_intr;

void  somefuncion(void)
{
    PHYSICAL_ADDRESS pa;

    // Bank 0
    pa.QuadPart = GetAddressByDevice(AM_DEVICE_GPIO0);
    s_intr.pGPIORegs[0] = (AM3XX_GPIO_REGS*)MmMapIoSpace(pa, sizeof(AM3XX_GPIO_REGS), FALSE);
    if (s_intr.pGPIORegs[0] == NULL)
    {
        DEBUGMSG(1, (L"ERROR: Am3xxGpioInit: Failed map GPIO0 controller registers\r\n"));
    }
    // Bank 1
    pa.QuadPart = GetAddressByDevice(AM_DEVICE_GPIO1);
    s_intr.pGPIORegs[1] = (AM3XX_GPIO_REGS*)MmMapIoSpace(pa, sizeof(AM3XX_GPIO_REGS), FALSE);
    if (s_intr.pGPIORegs[1] == NULL)
    {
        DEBUGMSG(1, (L"ERROR: Am3xxGpioInit: Failed map GPIO1 controller registers\r\n"));
    }
    // Bank 2
    pa.QuadPart = GetAddressByDevice(AM_DEVICE_GPIO2);
    s_intr.pGPIORegs[2] = (AM3XX_GPIO_REGS*)MmMapIoSpace(pa, sizeof(AM3XX_GPIO_REGS), FALSE);
    if (s_intr.pGPIORegs[2] == NULL)
    {
        DEBUGMSG(1, (L"ERROR: Am3xxGpioInit: Failed map GPIO2 controller registers\r\n"));
    }
    // Bank 3
    pa.QuadPart = GetAddressByDevice(AM_DEVICE_GPIO3);
    s_intr.pGPIORegs[3] = (AM3XX_GPIO_REGS*)MmMapIoSpace(pa, sizeof(AM3XX_GPIO_REGS), FALSE);
    if (s_intr.pGPIORegs[3] == NULL)
    {
        DEBUGMSG(1, (L"ERROR: Am3xxGpioInit: Failed map GPIO3 controller registers\r\n"));
    }
}

OALPAtoUA vs MmMapIoSpace

Both functions achieve the same goal so why use one instead of the other ?
OALxAtoxA functions are reserved for OAL use and can not be called from drivers (if you try, you will end with a link error saying that OALPAtoVA symbol has not been found). This is also why some parts of code use the following code:
#ifdef OAL
   // OALxAtoxA business
#endif
#ifdef DEVICE
  // MmMapIoSpace business
#endif
MmMapIoSpace is the function to use in drivers.

 
biz.